
Install in Minutes.
No digging. No concrete. No heavy lifting. Just a solid foundation, fast.









The Foundation Fundamentals
Before starting your build, it pays to understand the key principles that govern how a DeckEzy Foundation Block works. The tiles below cover the essential rules around materials, spacing, height, and ground preparation. Getting these fundamentals right from the start will save time on site and ensure your structure performs as intended.

Material Selection
Use structural timber rated for outdoors. Composite and pressure-treated lumber are both compatible.

Deck Height
Deck height is determined by joist size, post height, and decking thickness. The structure must not exceed 36".

Modifications
Do not modify DeckEzy Foundation Blocks in any way, as it can reduce structural integrity and void warranty.

Stacking
DeckEzy blocks cannot be stacked to increase deck height. They are not designed to bear load while stacked.

Angled Levelling
If the ground is sloping, dig out beneath the block until it sits flat and makes full contact. Digging out instead of building up is the recommended method.

Ground Preparation
Remove grass and loose topsoil before placing blocks, or lay 3" of compacted paver base for best practice.
Know Your Build
Before breaking ground, understanding how your substructure fits together will save time and avoid costly adjustments on site. The measurements below cover the key spacing rules that determine how many blocks you need, where they go, and what lumber sizes are appropriate for your project.
The figures and recommendations in this guide are intended as a general reference only. Building codes, load requirements, and approved construction methods vary by state and municipality. Always consult your local building code and, where required, seek sign-off from a qualified engineer or building professional before commencing construction.

Joist Centers
Joist centers refers to the distance between joists, measured from center to center. A maximum of 16" on center is recommended, though your decking material may require tighter spacing.

End Blocks
The DeckEzy Foundation Blocks at both ends of each joist should be positioned no more than 12" in from the edge, ensuring the joist ends are adequately supported and the blocks sit on stable ground.

Double Joists
DeckEzy Foundation Blocks are designed with double joists in mind. The wide central channel accommodates two standard 2" joists side by side, making it straightforward to double up wherever your design requires additional strength.

Cantilever
For a cleaner finish, the Foundation Blocks supporting the rim joists can be removed and replaced with lumber blocking running perpendicular between the rim joist and the second joist in, spaced no more than 16" on center.

Posts
Posts are seated firmly into the block pocket and cut to length based on your finished deck height minus the joist and decking thickness. A notch cut into the top of each post allows the joist to bear on solid timber.
Joist Span
Joist span refers to the maximum distance a joist can travel between supports. The limiting factor in any span is not the DeckEzy Foundation Block, but the lumber spanning between them. Your lumber size and species greatly affect how far a joist can safely span between DeckEzy Foundation Blocks. Find your lumber below to get started:

Maximum span measured centre-to-centre between DeckEzy Foundation Block supports. Always follow local building codes and project-specific requirements.
Span Options
The span figures above assume a single joist running continuously between blocks. For longer spans, a sistered joist arrangement can be used to extend the reach of your framing beyond what a single board length allows. A bearer substructure is an alternative configuration that distributes load more efficiently across fewer blocks, reducing the total number of footings required.
Sistered Joist
A sistered joist overlaps an existing joist to extend a span beyond a single board length. The overlap must be a minimum of 24", centred over a block. Fasten the overlap in accordance with your local building code, as fastening requirements will vary by region and application.

Bearer Substructures
Bearers run perpendicular to joists and transfer load down to the blocks. Foundation block spacing should match your span in both directions, allowing you to use fewer DeckEzy Foundation Blocks. Joists sitting on top follow the same spacing rules as a standard installation.

Building Easy With DeckEzy
Once you have a clear understanding of the spacing rules and lumber requirements for your project, choose your build type below for a full step-by-step walkthrough.

Low Profile Deck
The following steps are of an example low profile deck build approximately 10x10ft.
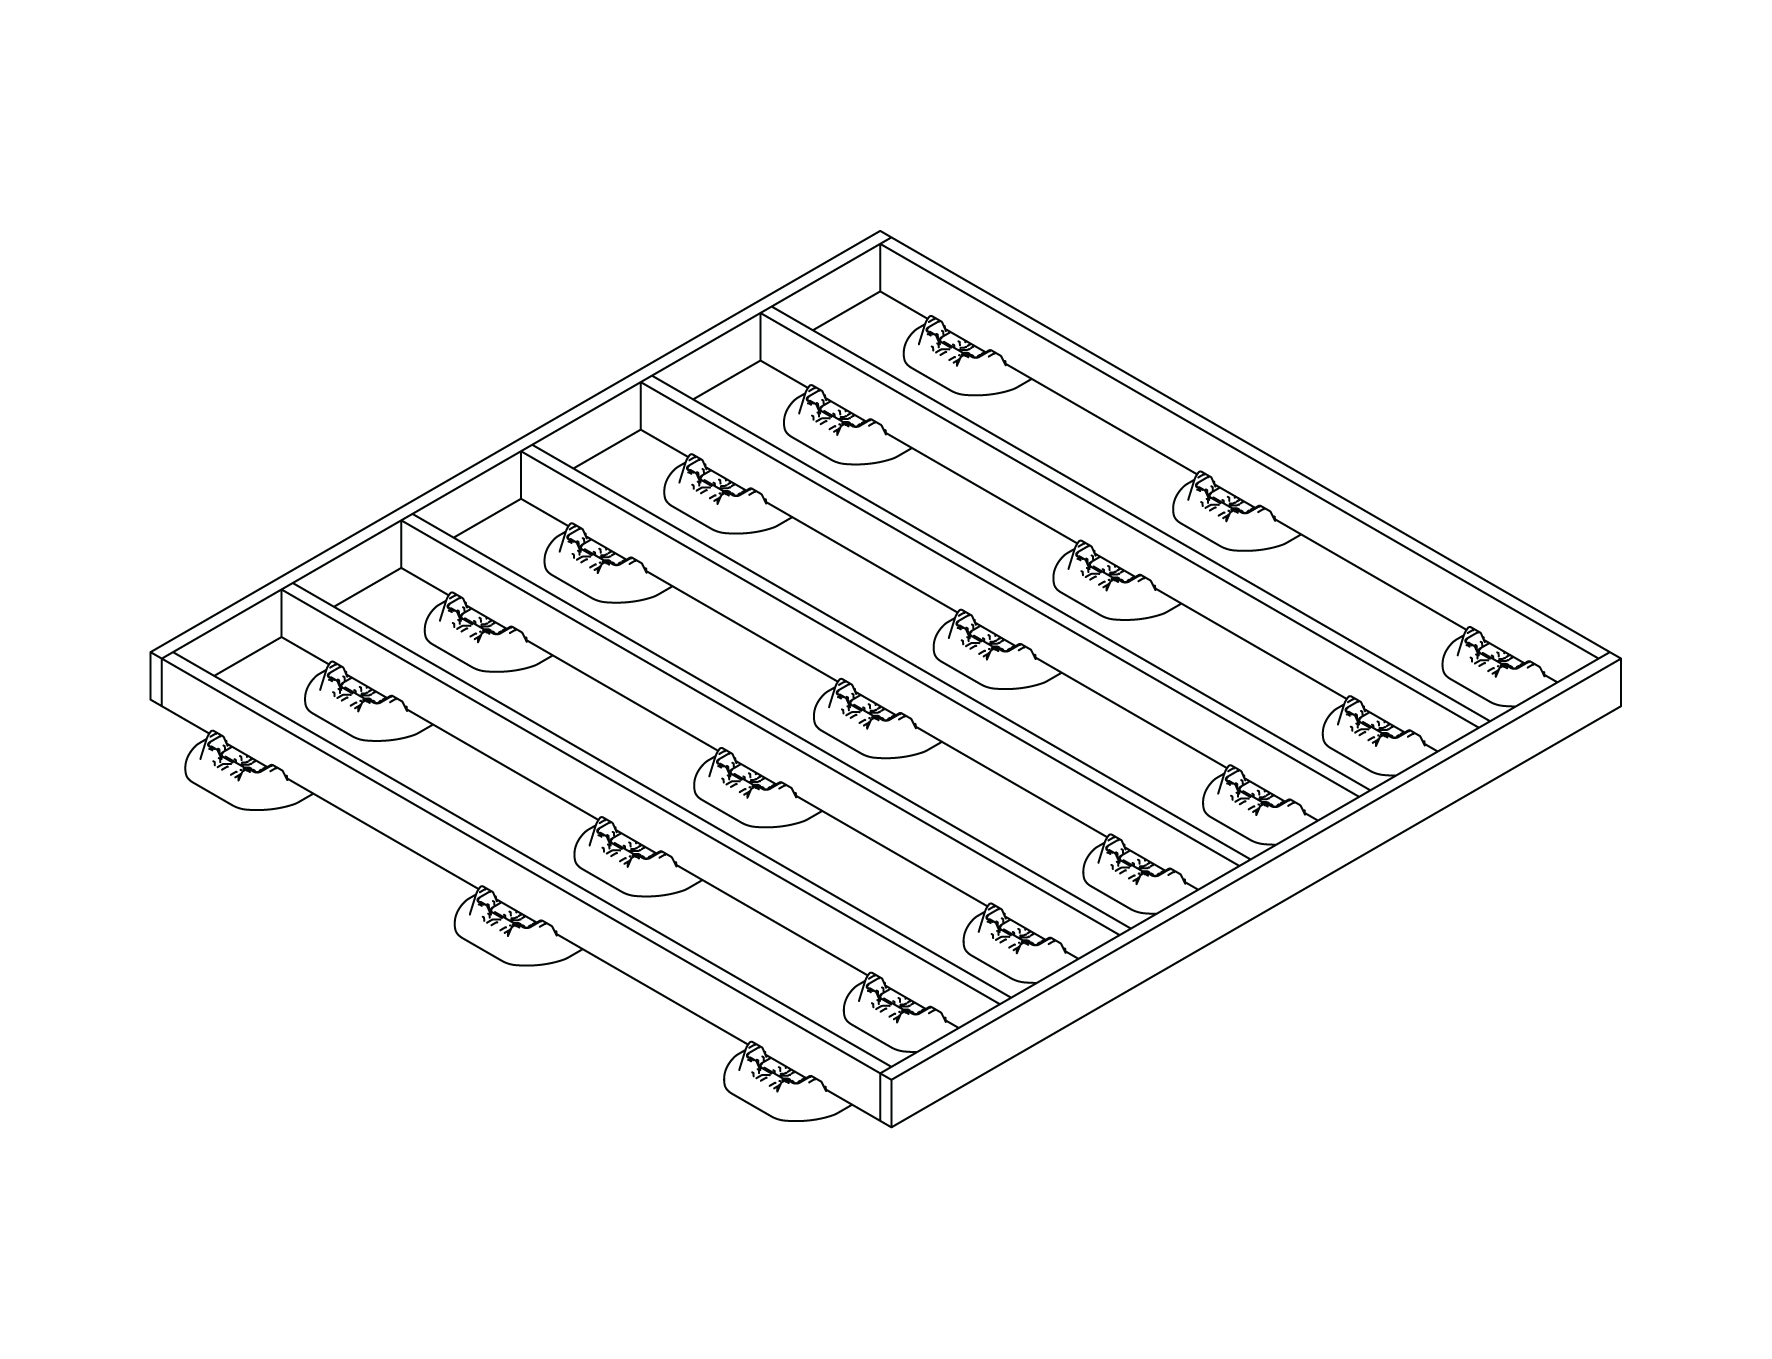

Position All DeckEzy Blocks
After planning your unique layout, place DeckEzy Blocks. Perimeter blocks should be no more than 12" in from each end. Exact spacing isn't critical, but blocks must be no more than 60" apart, in a straight row, and evenly spaced.
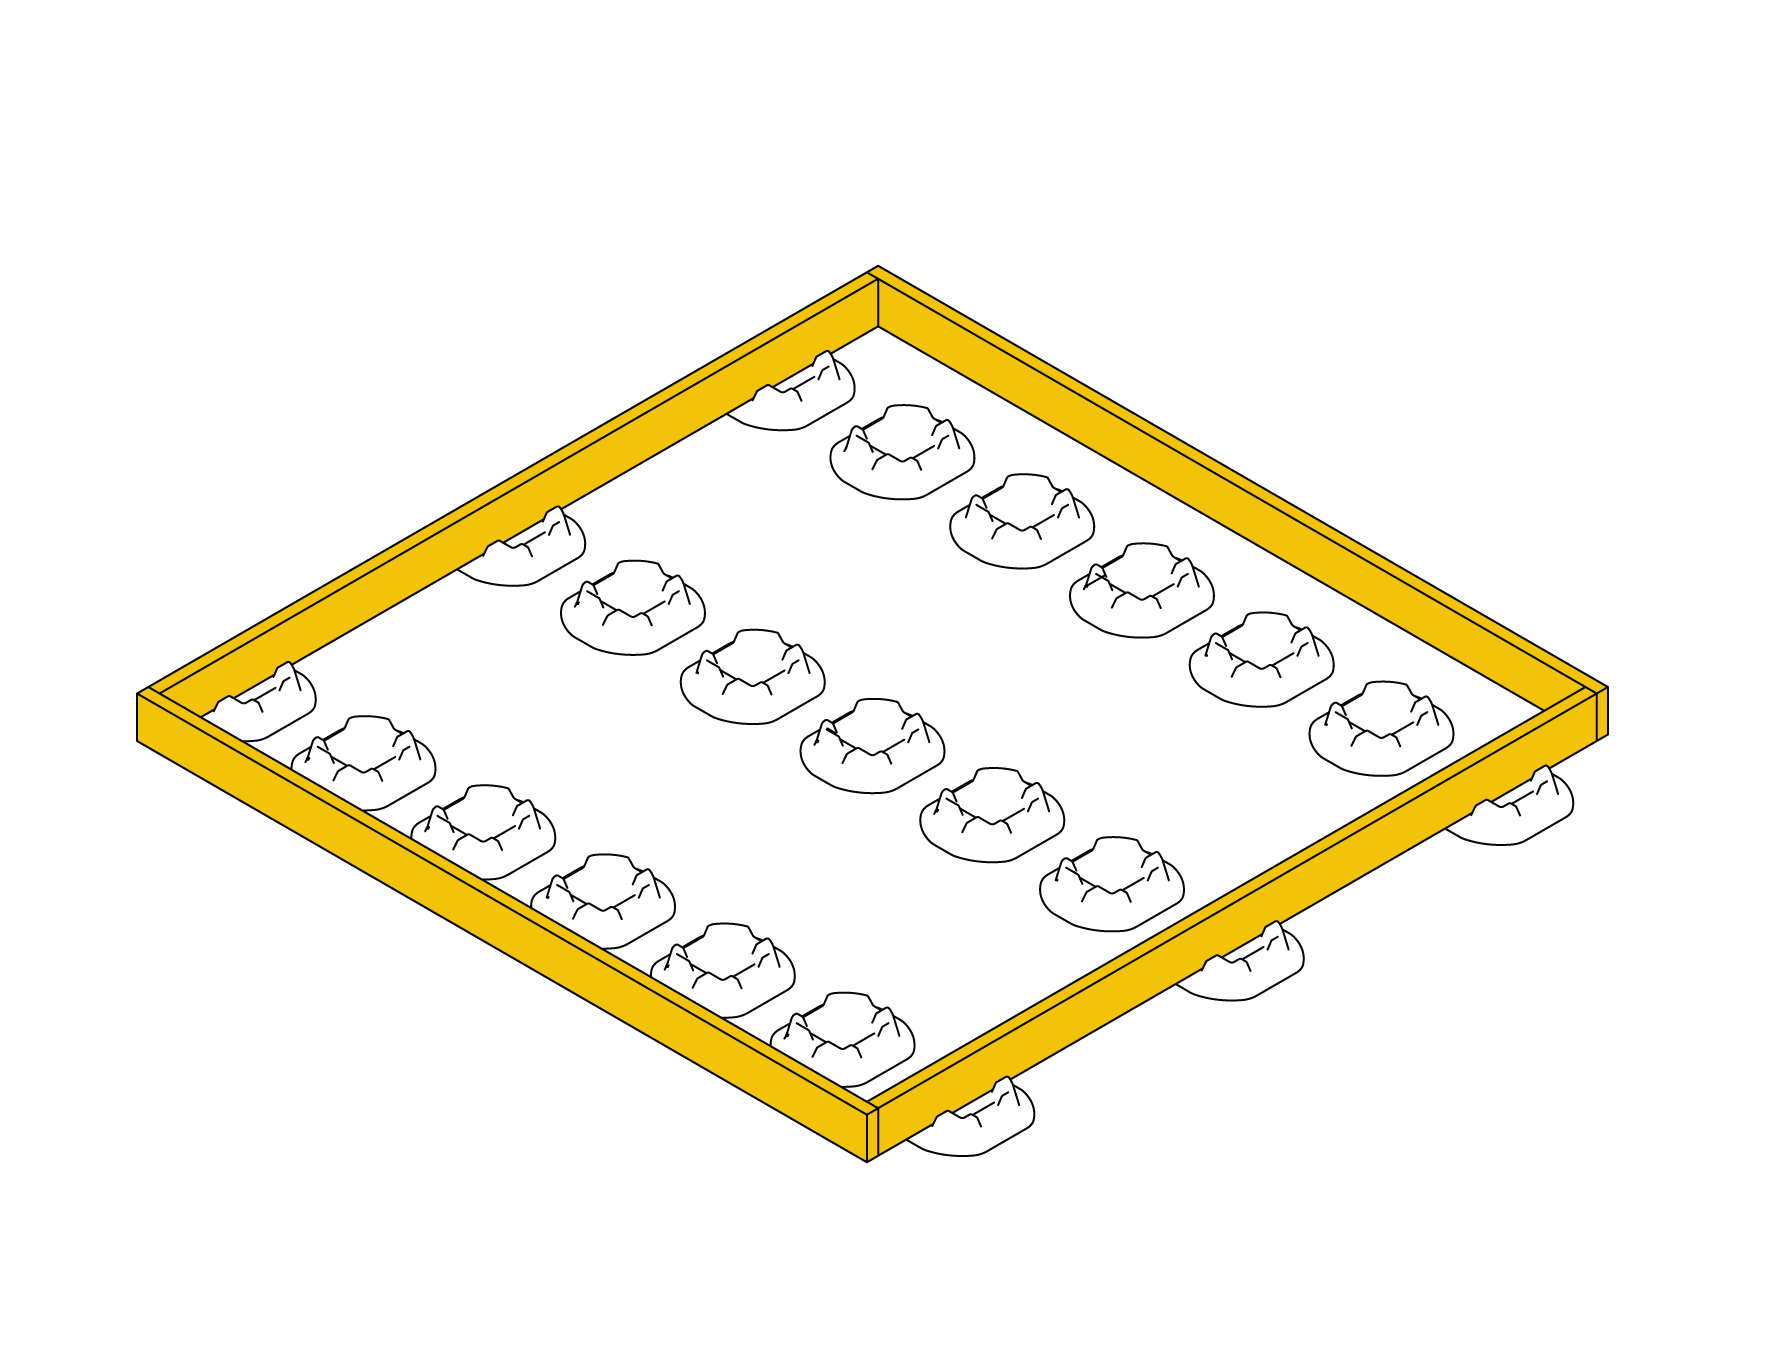
Construct The Frame
Fit the rim joists to form the outer frame with two 14-gauge 3" countersunk exterior timber screws per connection. Measure both diagonals, equal diagonals mean the frame is square. Don't fix permanently until level and square are confirmed on all four sides.
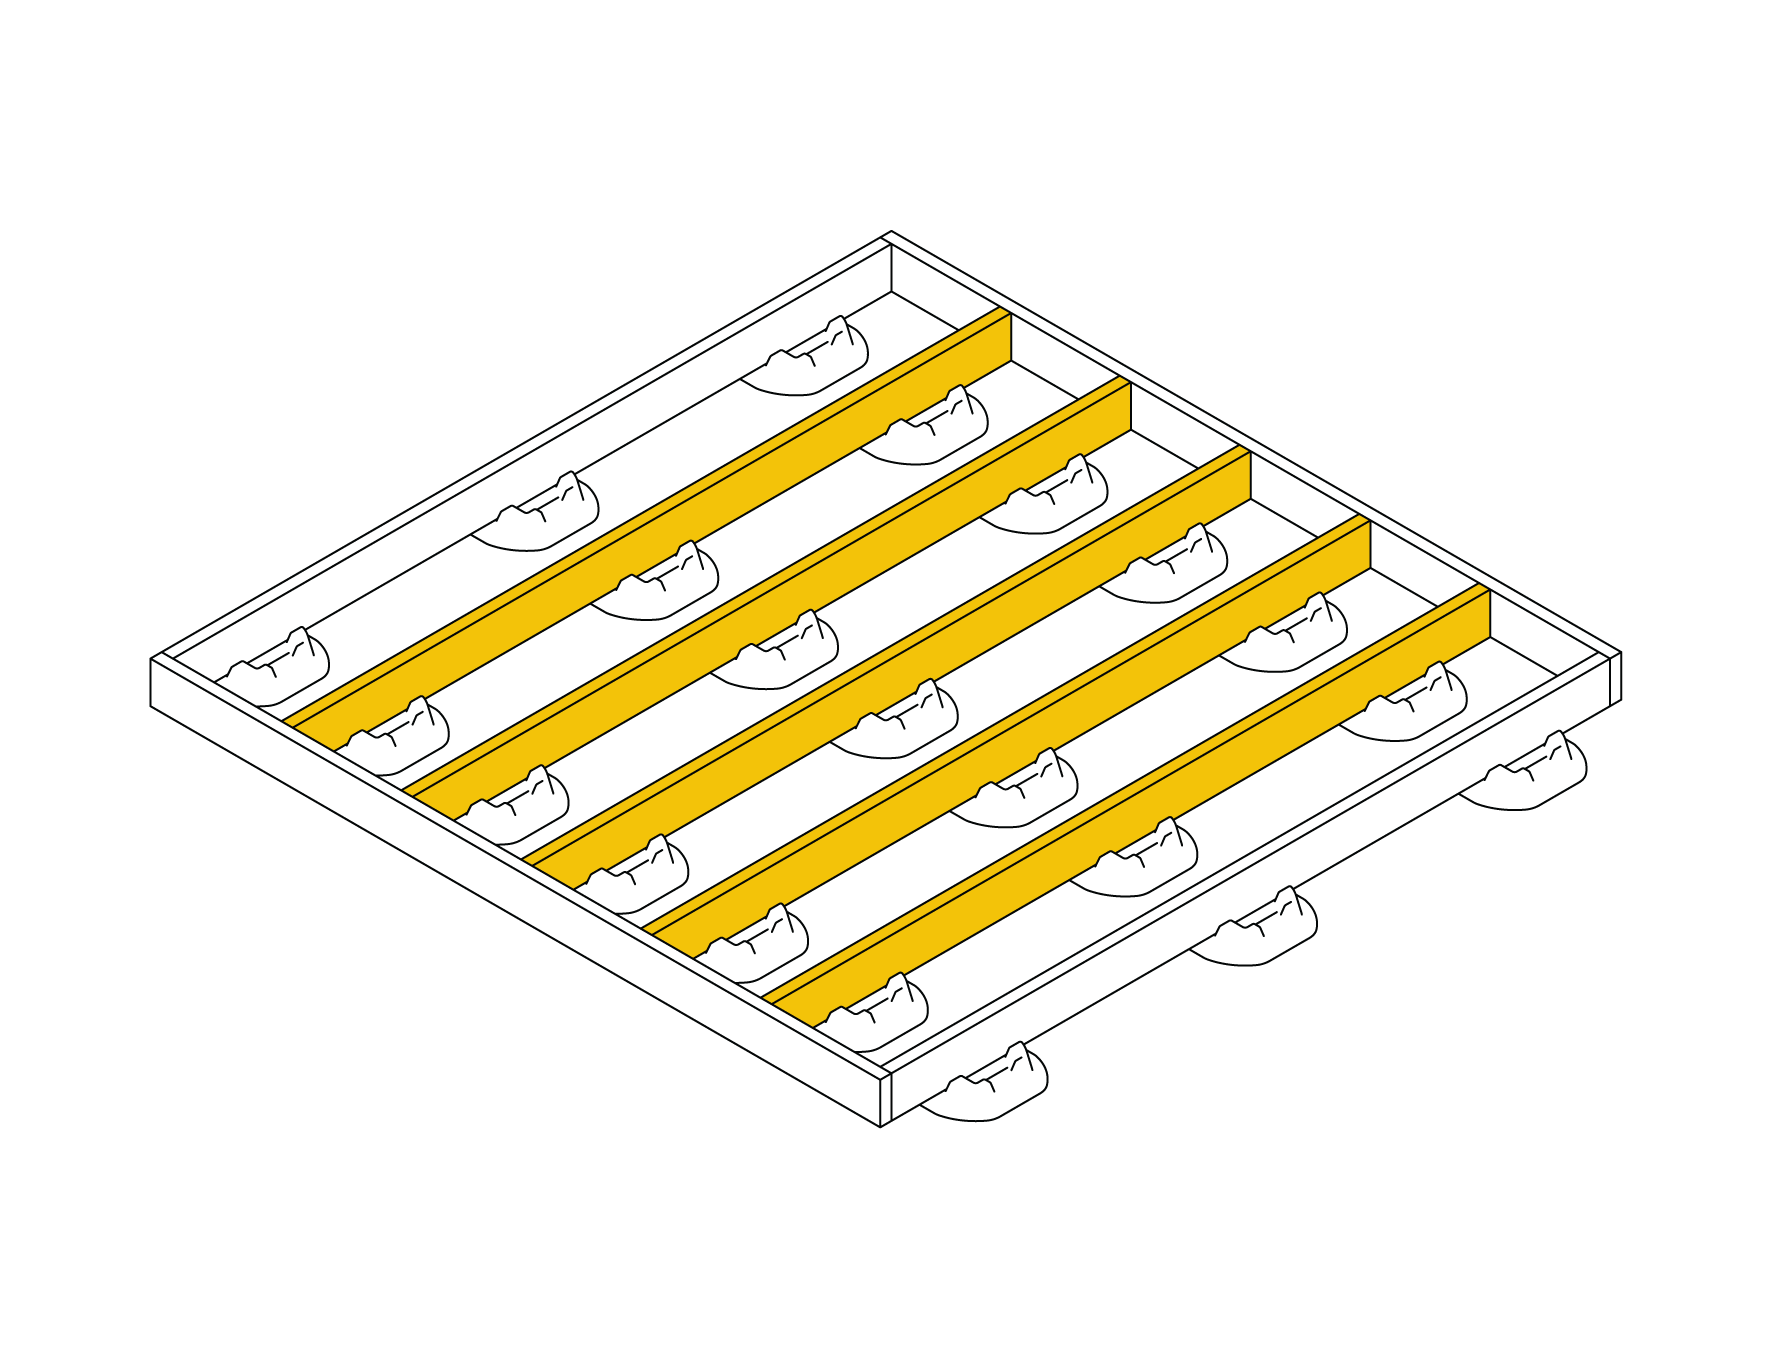
Attach The Interior Joists
Fix the remaining joists to the frame with two 14-gauge 3" countersunk exterior timber screws per connection.
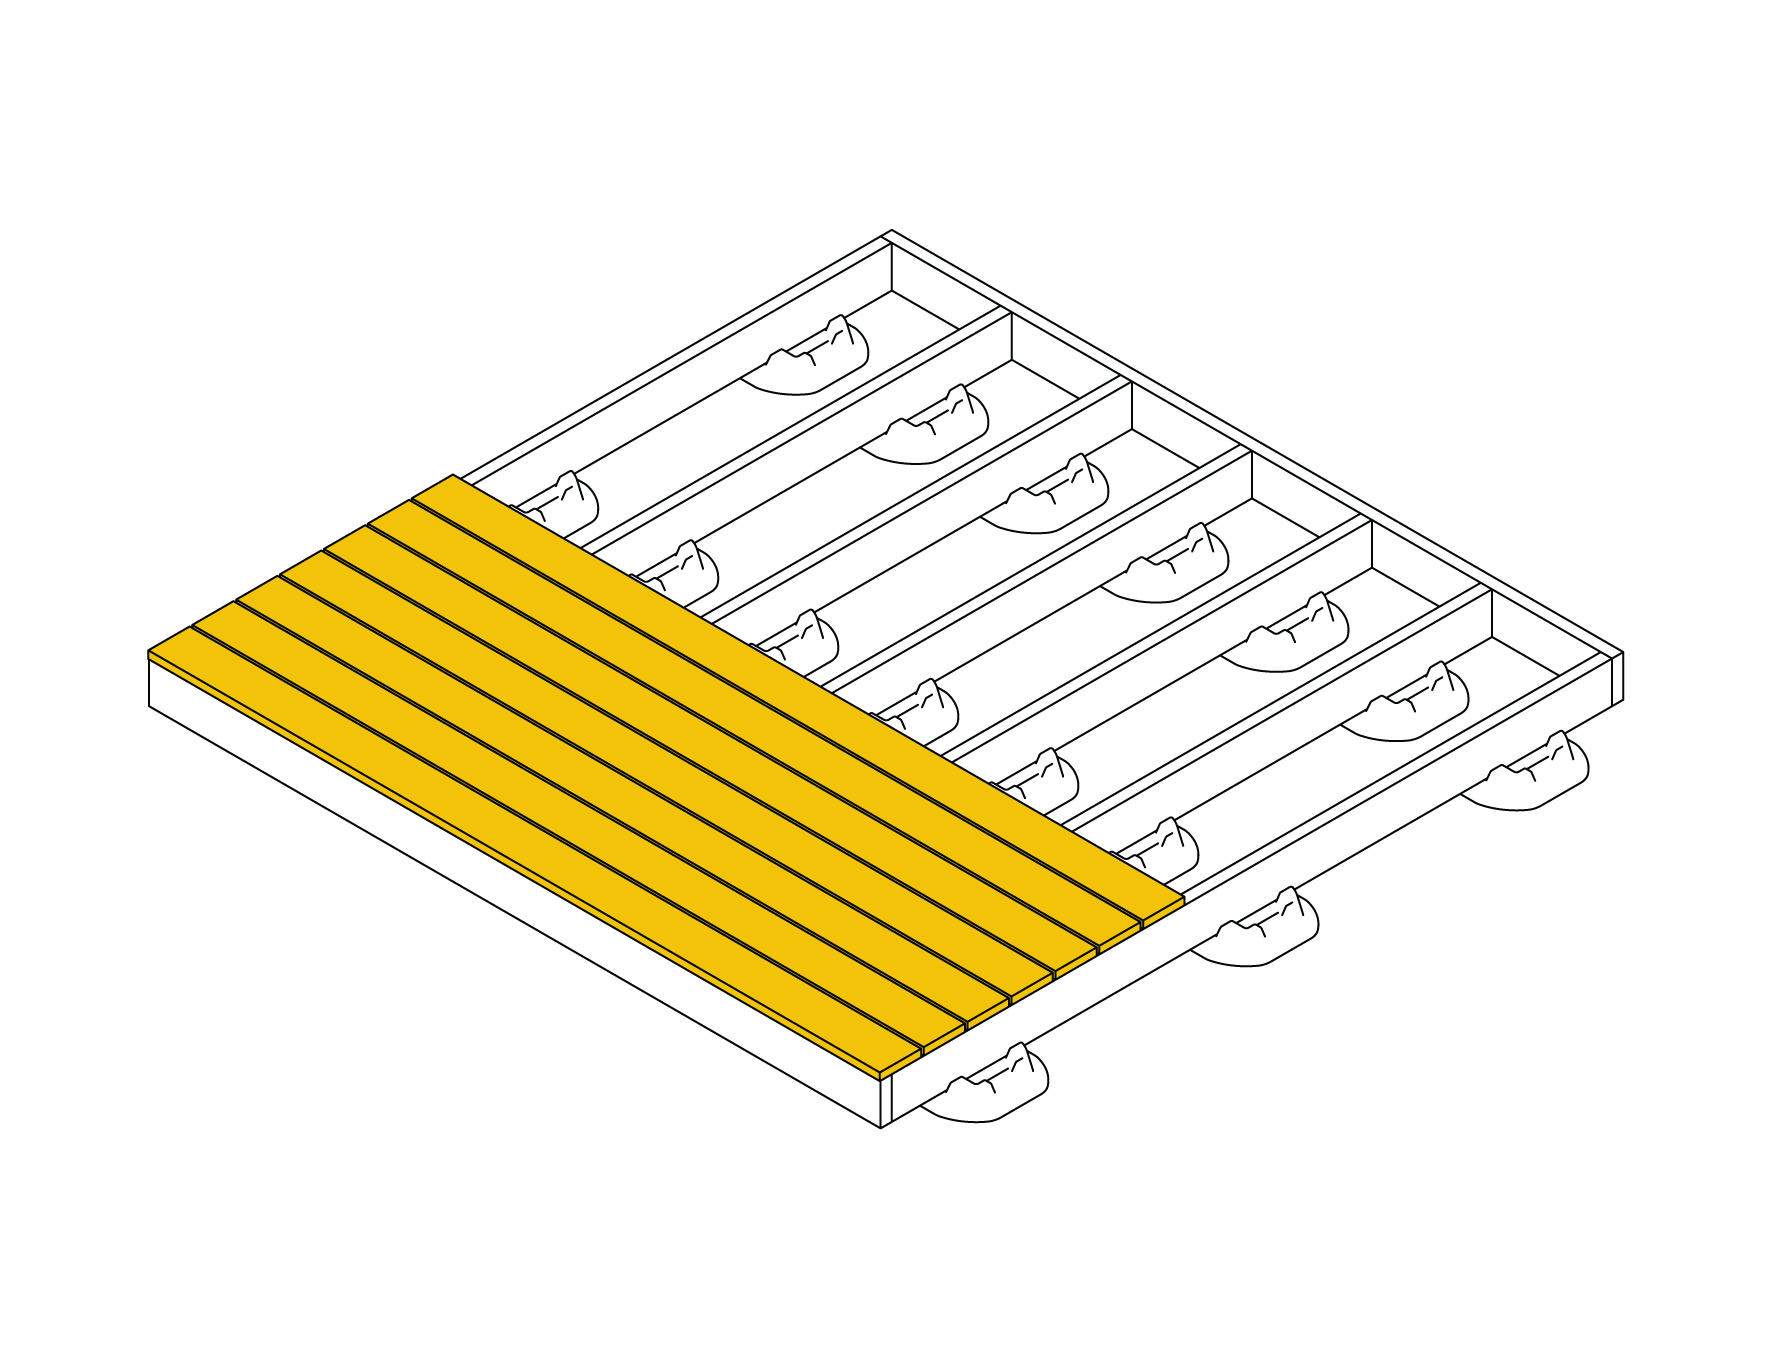
Attach Decking Boards
Start at one edge and fix the first board flush with the outer rim joist. Leave a ⅛"-¼" gap between board ends and any adjacent structure. Fix the rest per your decking manufacturer's instructions.
The materials shown are for illustration only. Lumber size, joist spacing, and hardware will vary with your deck's scale, load, and local code. Always check local building codes before you start, and consult a professional for advice specific to your build.
Sloped Surface Deck
The following steps are of an example sloped surface deck build approximately 10x10ft.
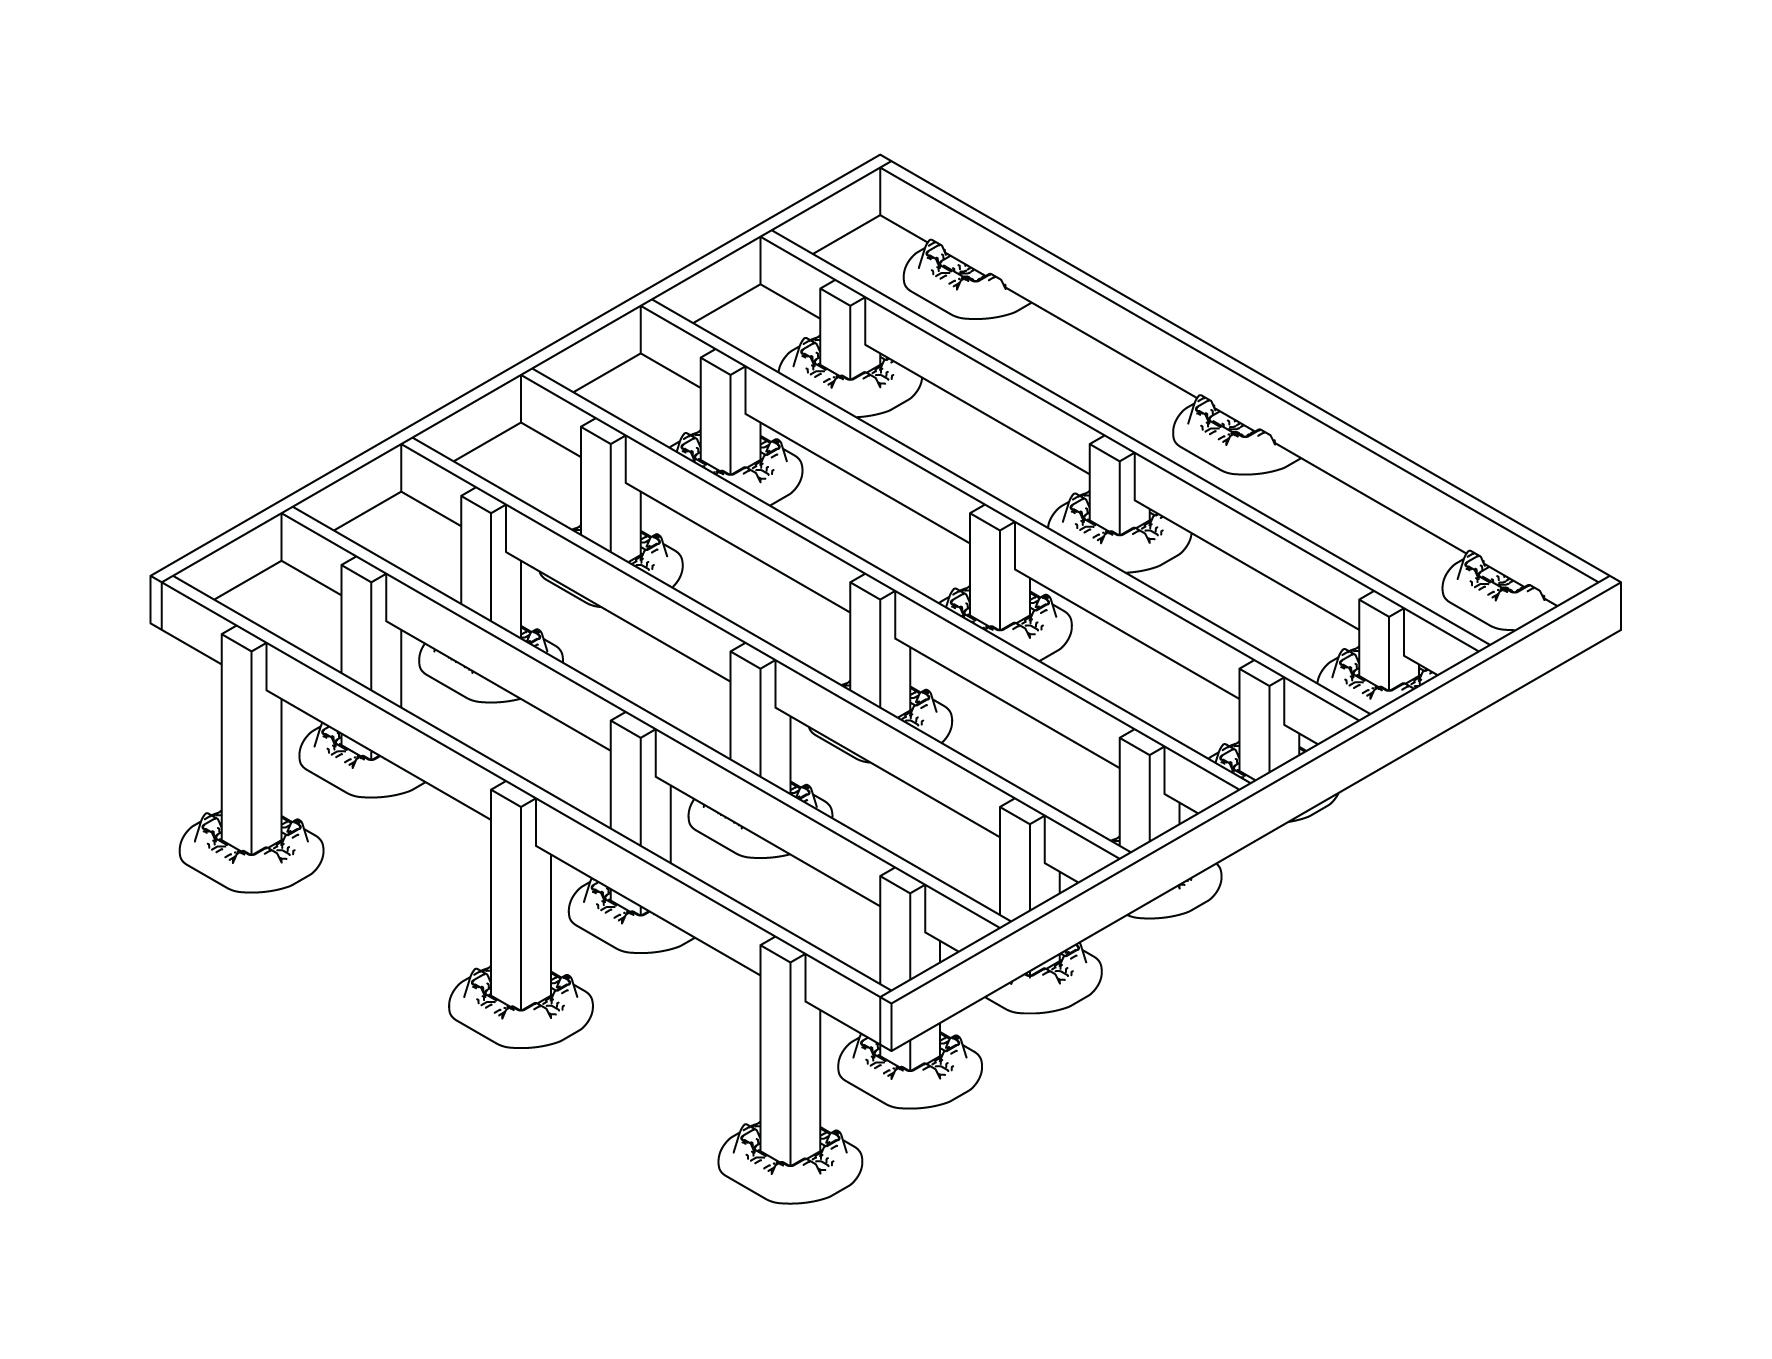

Place DeckEzy Corner Blocks
Set blocks on the ground to your plan. Remove grass and top soil under each block until it sits level. If building against an existing structure, place blocks as close to it as possible. A perfect level isn't needed yet, an eye-level check is fine, since post height corrects any lean later. Each block must sit flat with no rocking.
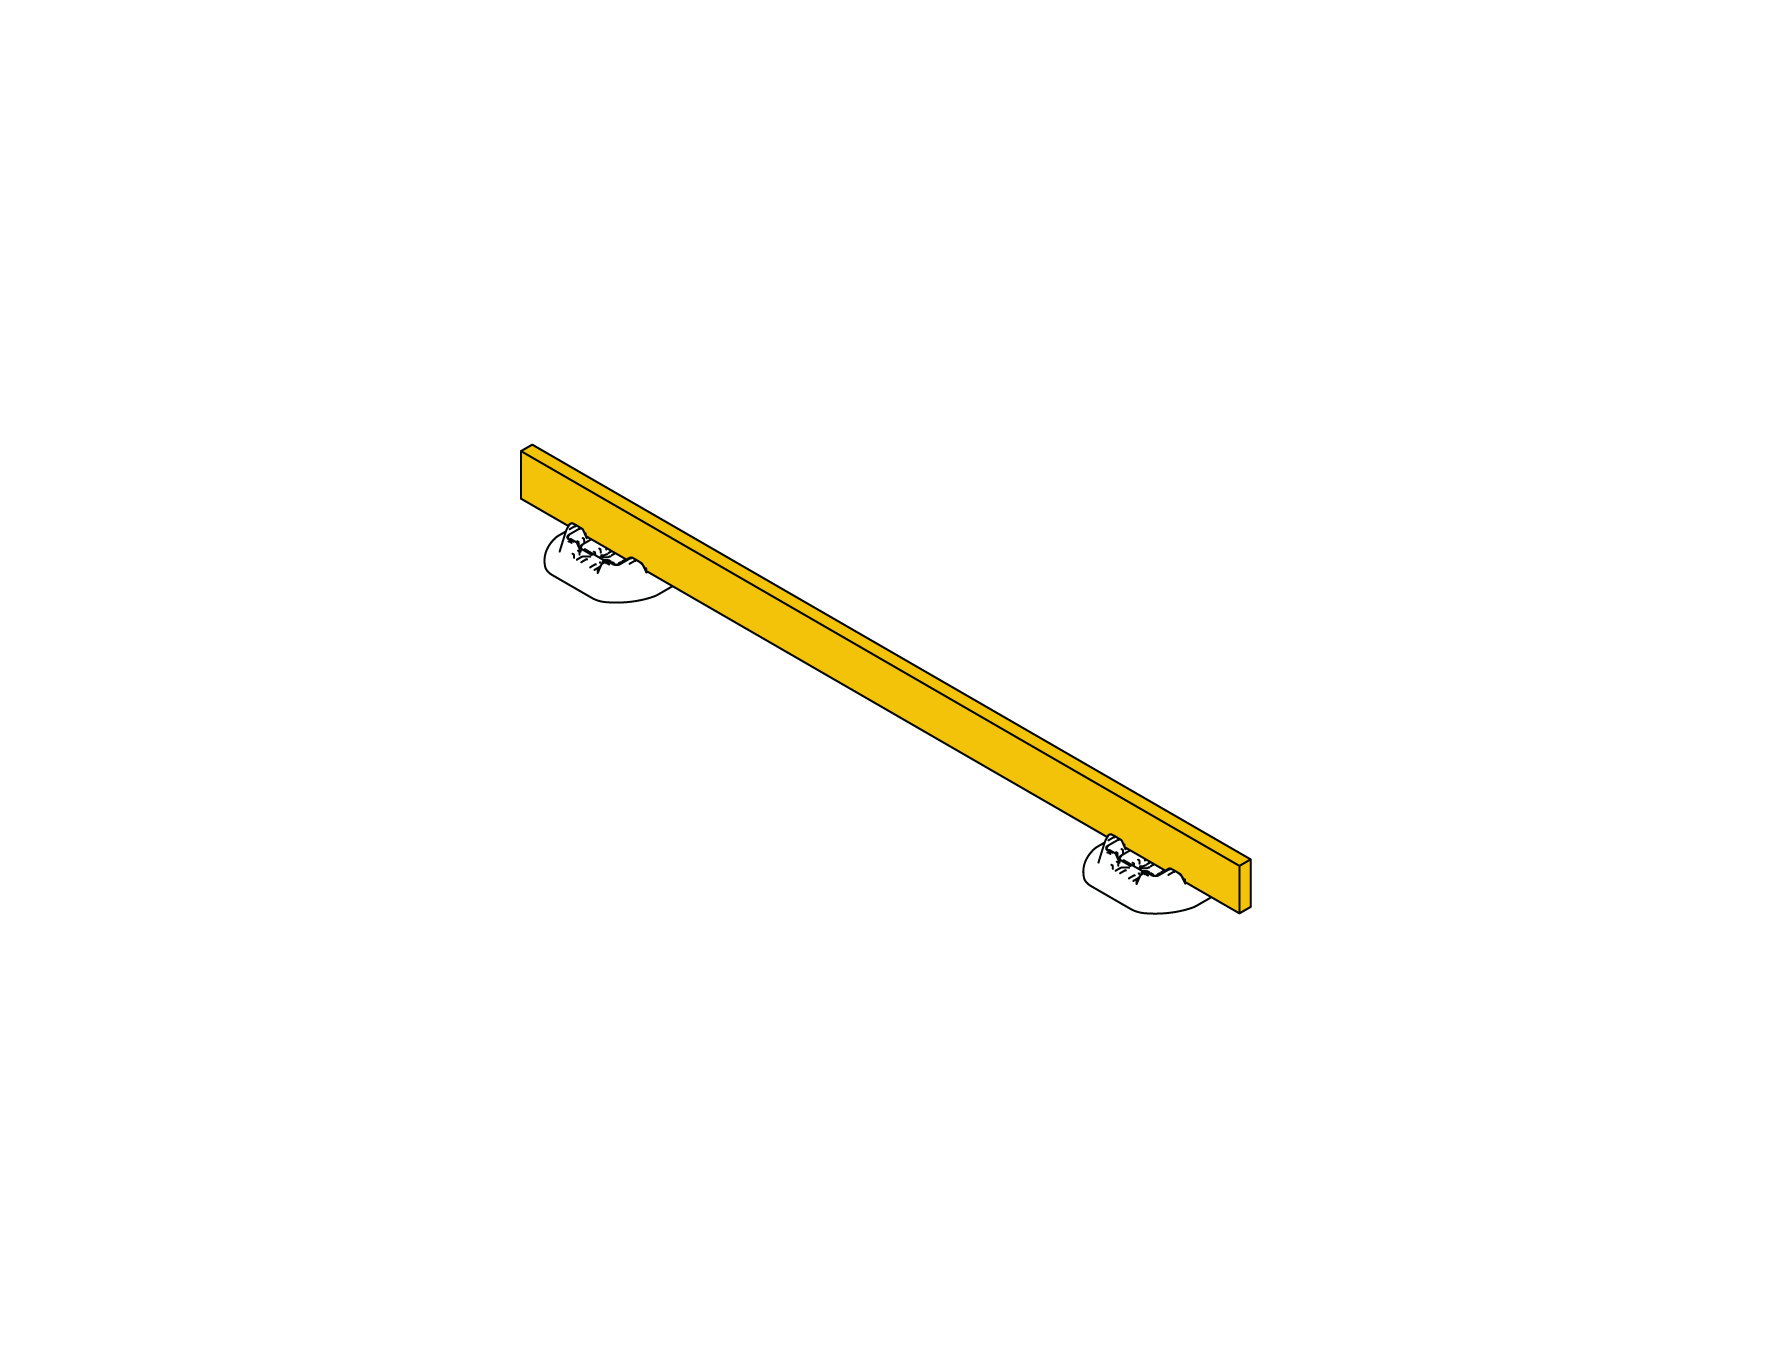
Level The Floor Joist
Start at the highest block and set a joist in its slot at your desired height (elevated deck: fit a post in the block first, then the joist). Run the joist across to the second corner block, rest a level on top, and measure down to that block's pocket. Cut a post to that length and sit the joist on it. Check the joist is level. Don't fix it to the post yet.
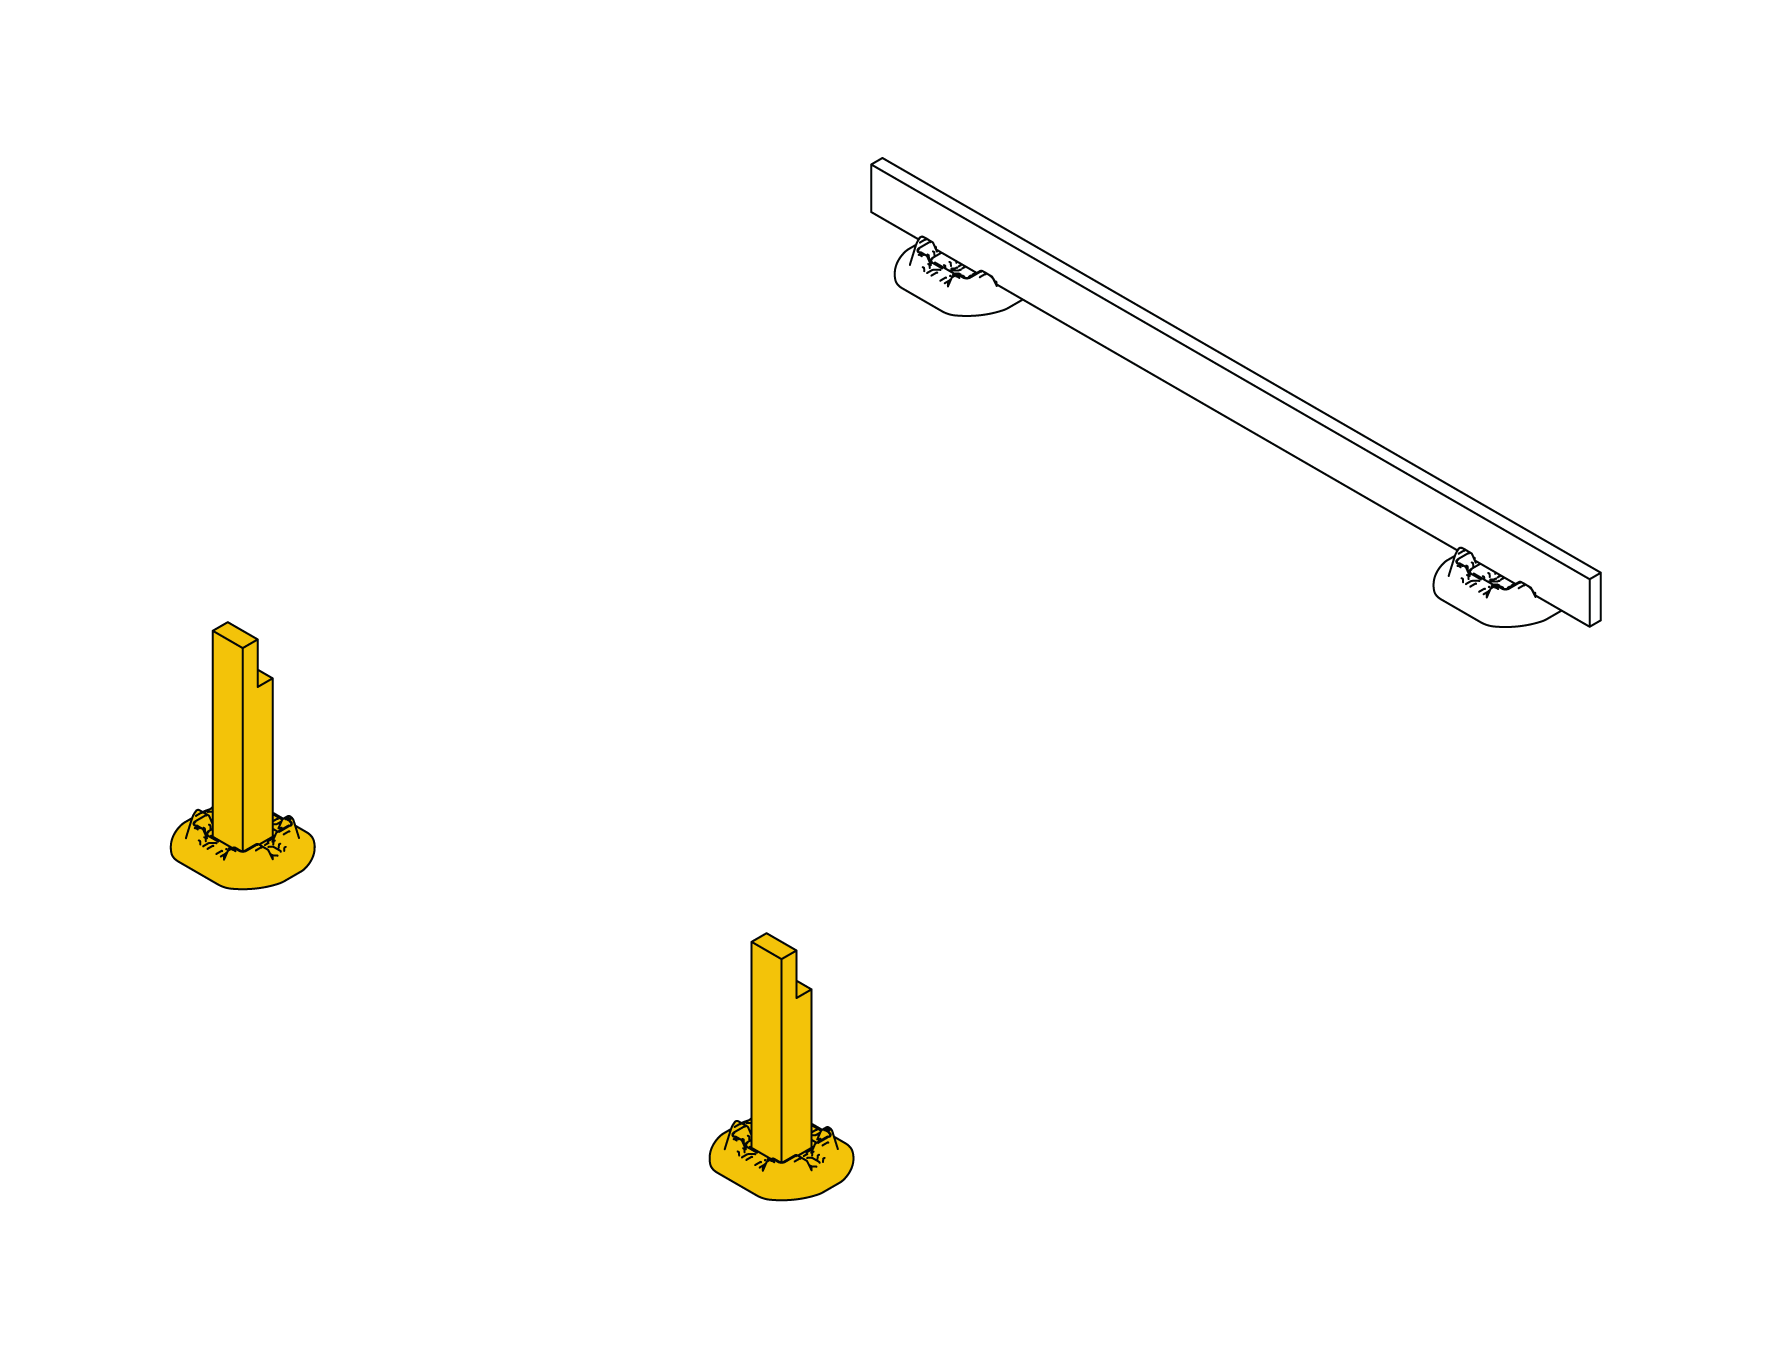
Level The Opposite Corner Blocks
Measure from the existing structure to the outside edge of the post to set your deck depth, e.g. for a 10ft deck, the post's outer edge sits 10ft from the structure. Match the block spacing from the first row, but don't measure off the first row itself.

Measure And Cut The Corner Posts
Remove the floor joist. Lay a trim board from the first row's post/block out to the outside corner block. With a level on top, measure from the top of the trim board down to the bottom of the block pocket. Cut a post to that length. Check the trim board is level, then repeat on the opposite side.

Construct The Outside Frame
With the corner blocks in place, fit the rim joists to form the outer frame. Check level on all four sides, adjusting post heights as needed. Measure both diagonals, equal diagonals mean the frame is square. Don't fix permanently until level and square are confirmed.
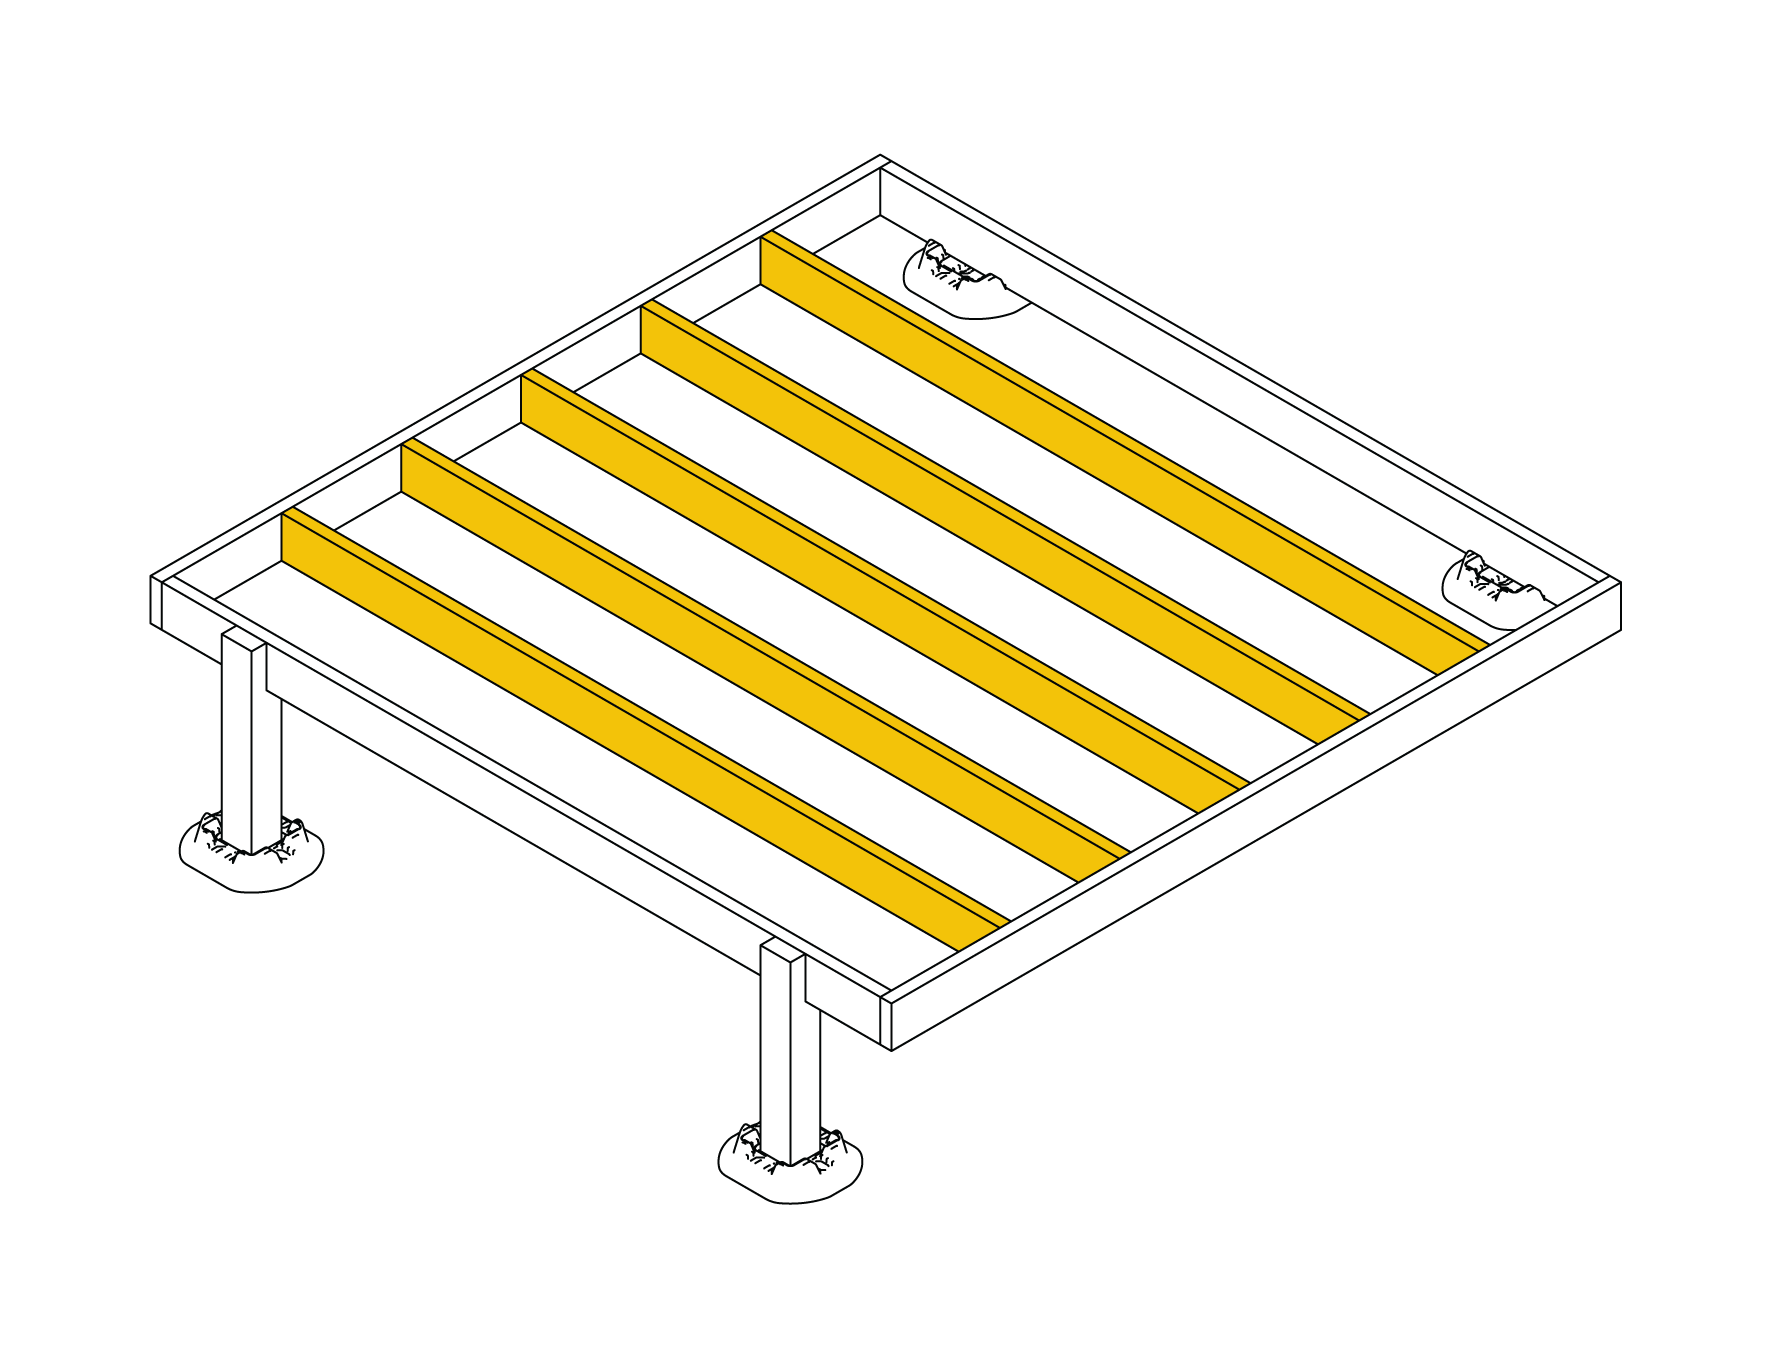
Attach The Interior Joists
Fix the remaining joists to the rim joists with two 14-gauge 3" countersunk exterior timber screws per connection.
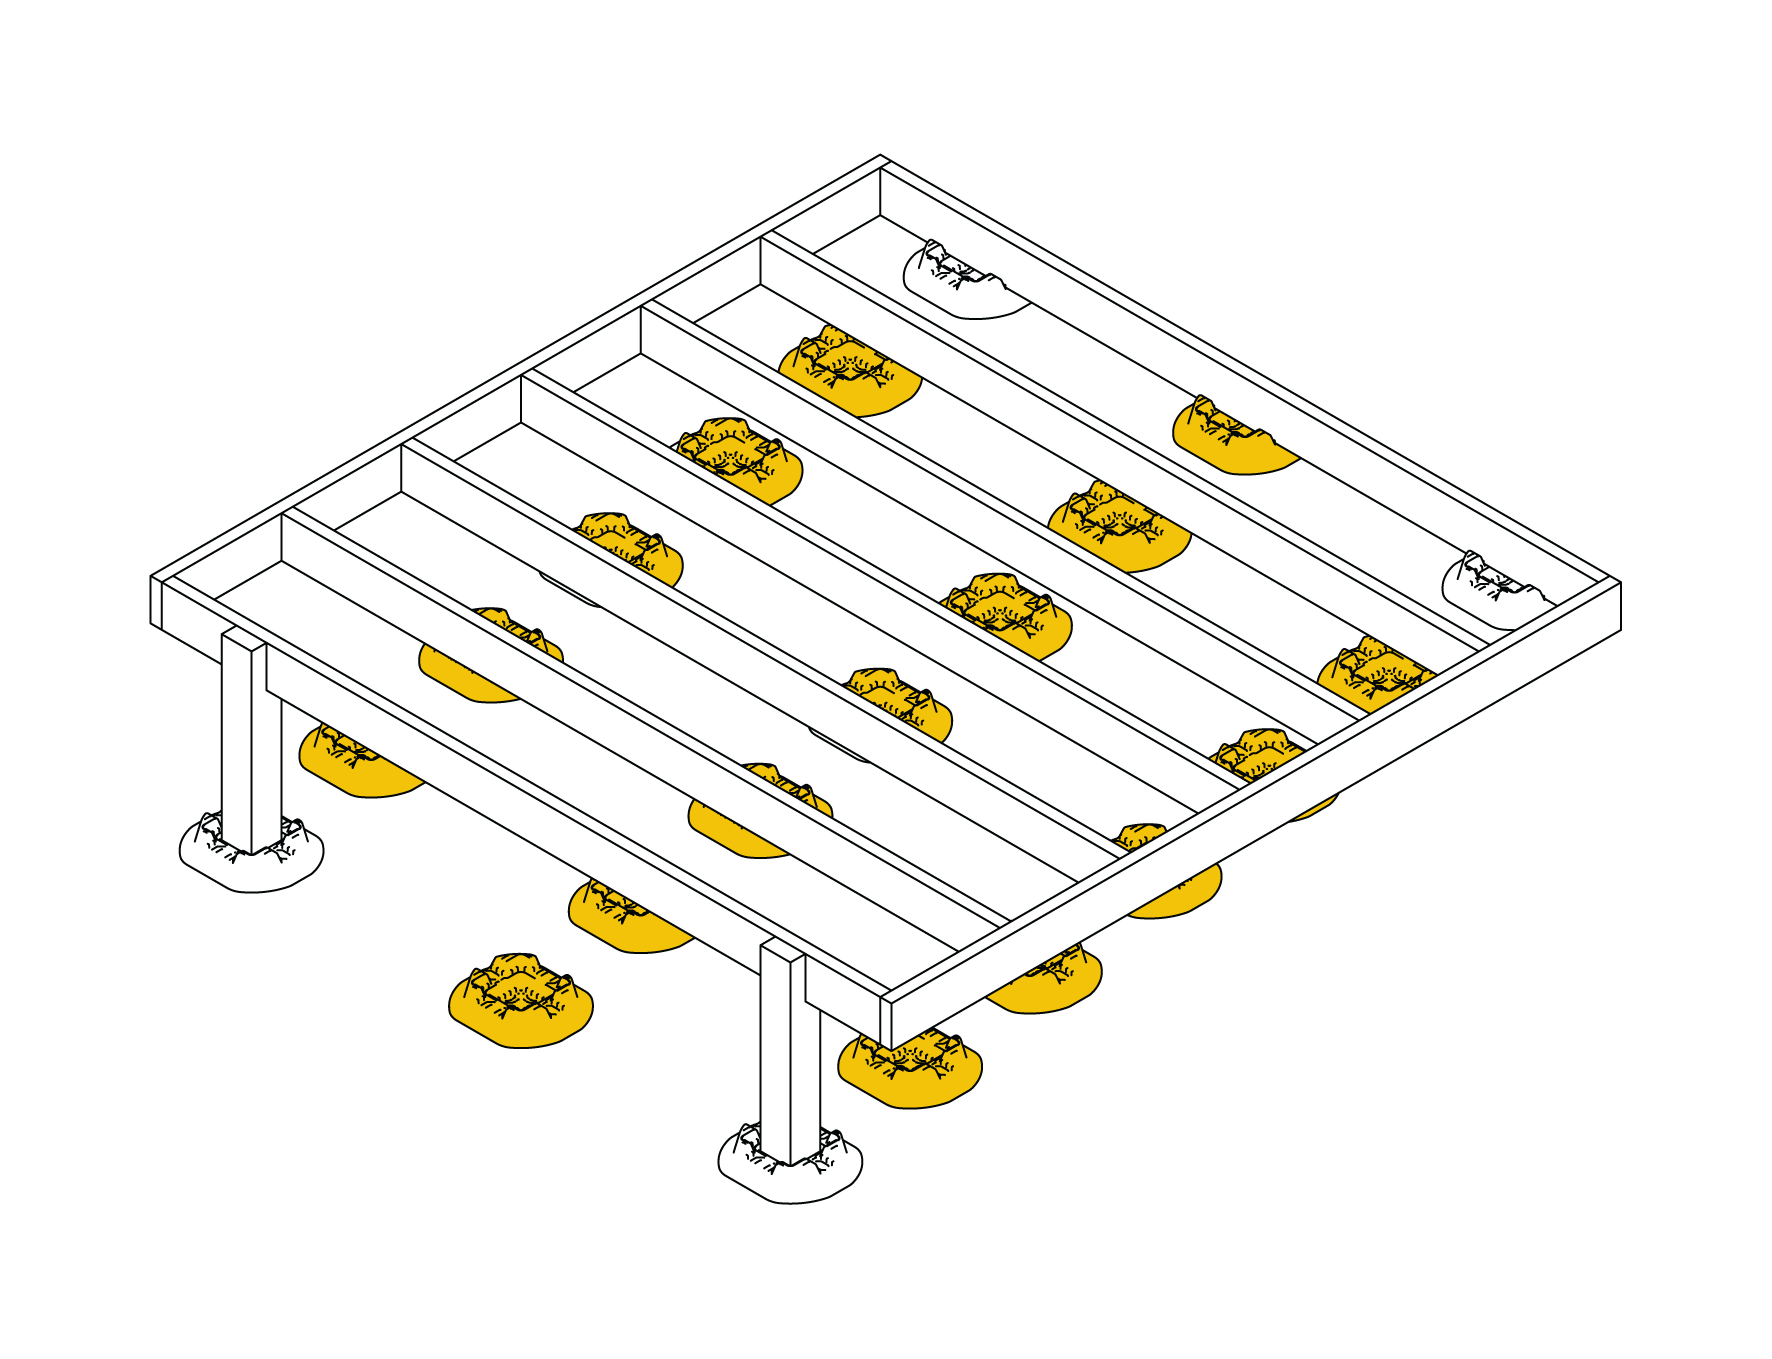
Position All DeckEzy Blocks
Using the frame as a guide, place the remaining blocks directly under the joists, with perimeter blocks 12" in from each end. Exact spacing isn't critical, but blocks must be no more than 60" apart, in a straight row, and evenly spaced.
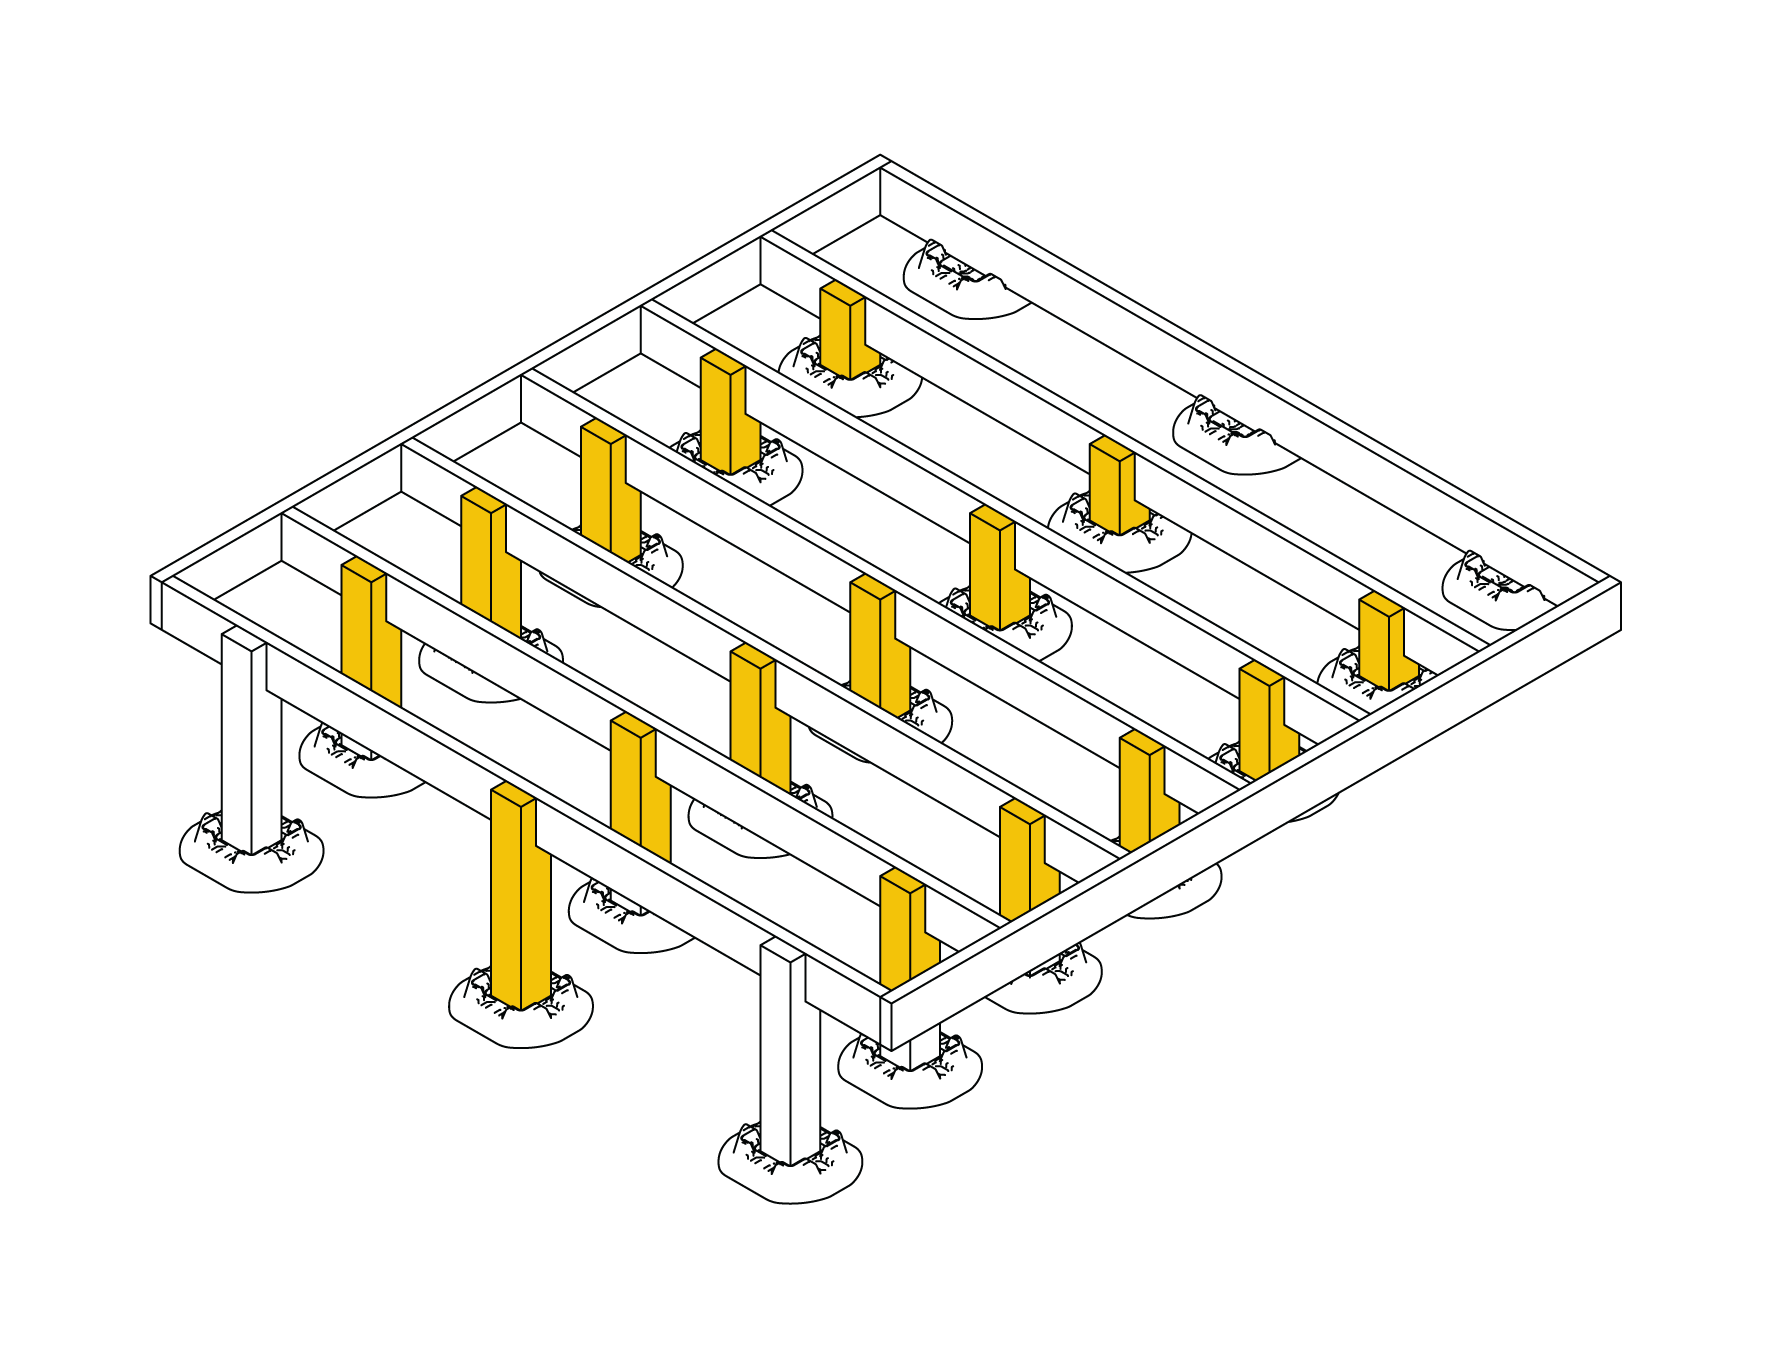
Add All Remaining Posts
Cut posts to length and seat each between a joist and its block. With all posts in place, fix every joist-to-post connection with two 14-gauge 3" countersunk exterior timber screws.
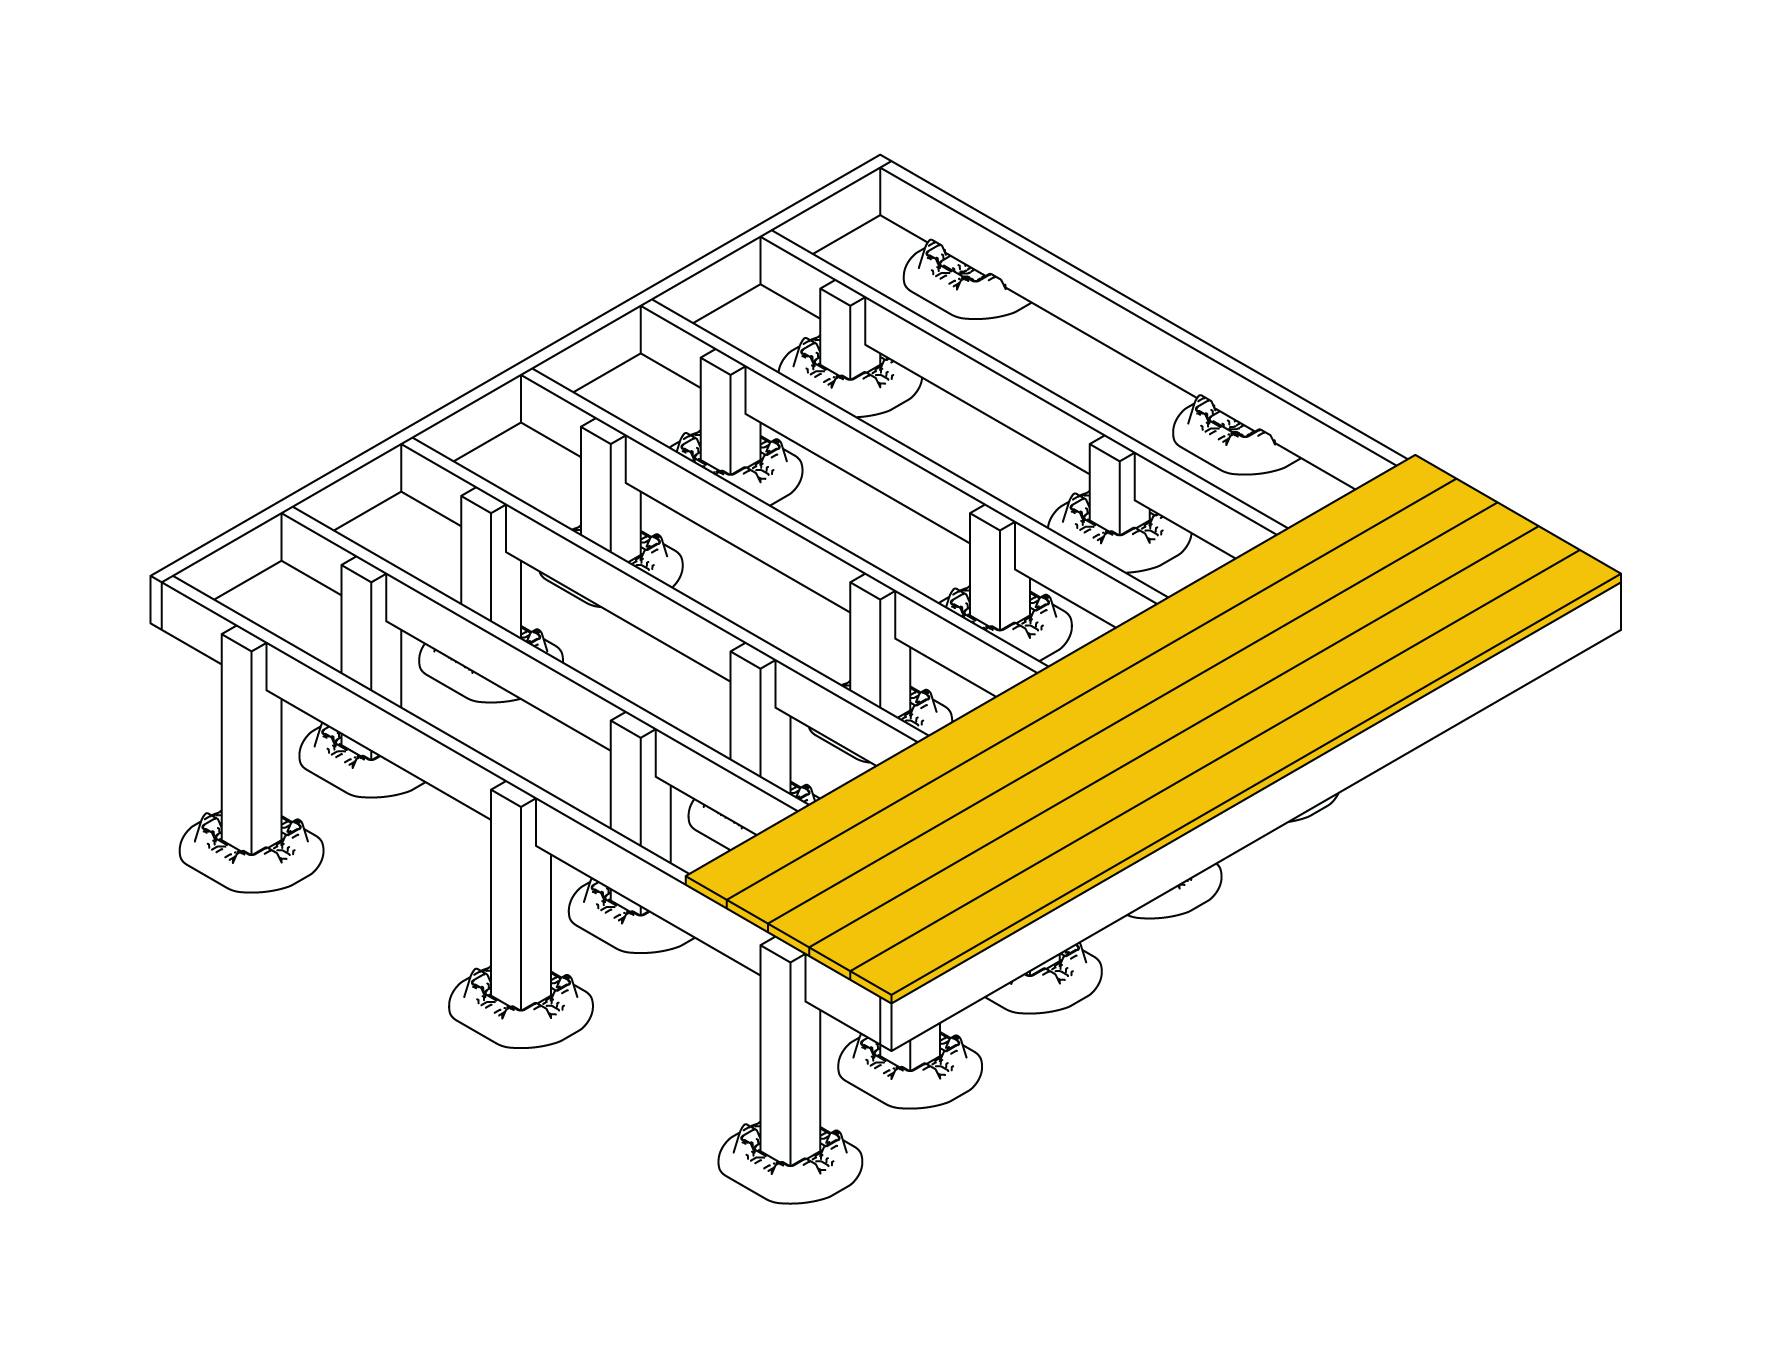
Attach Decking Boards
Start at one edge and fix the first board flush with the outer rim joist. Leave a ⅛"-¼" gap between board ends and any adjacent structure. Fix the rest per your decking manufacturer's instructions.
The materials shown are for illustration only. Lumber size, joist spacing, and hardware will vary with your deck's scale, load, and local code. Always check local building codes before you start, and consult a professional for advice specific to your build.
Raised Profile Deck
The following steps are of an example raised deck build approximately 10x10ft.
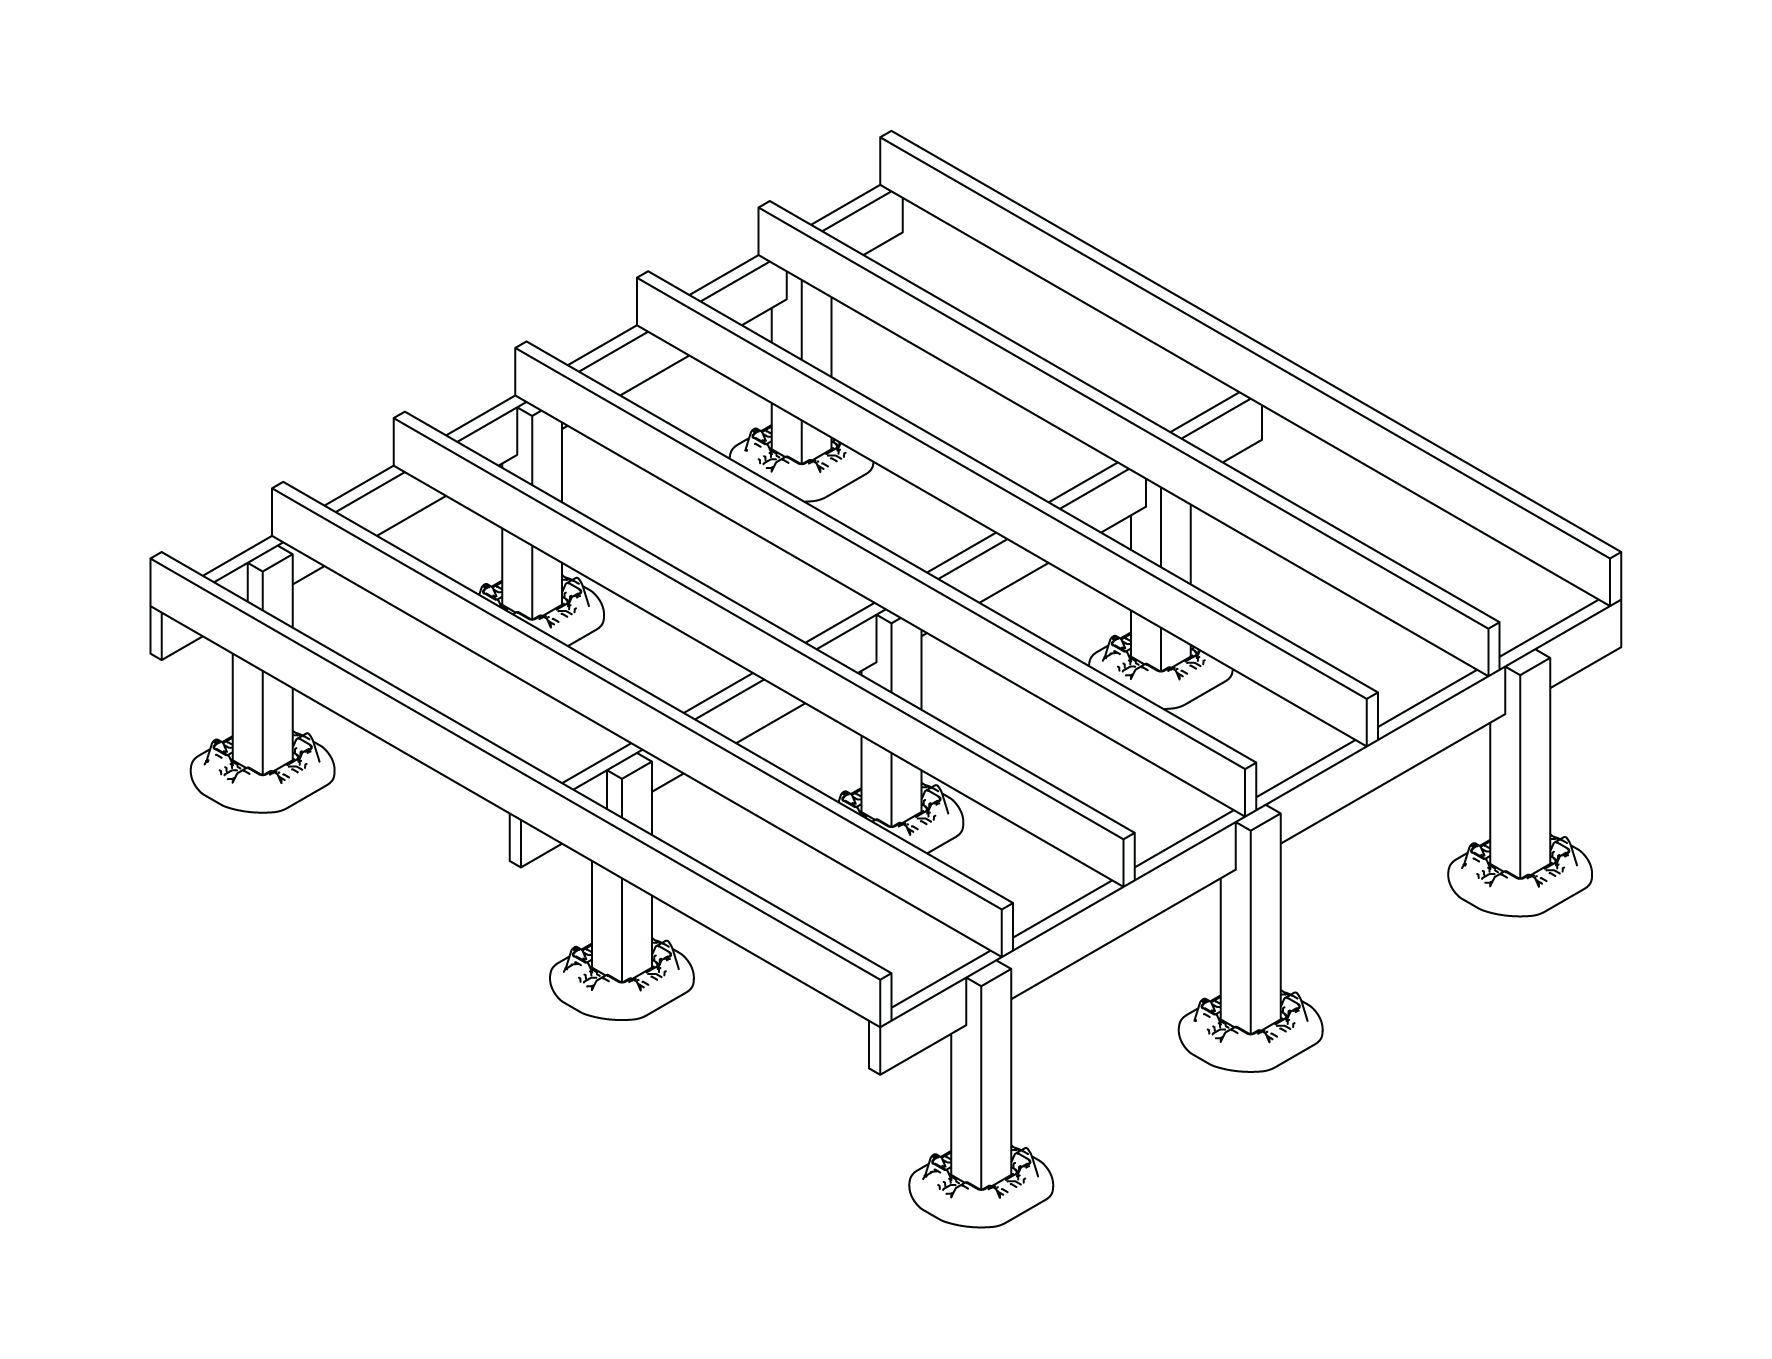
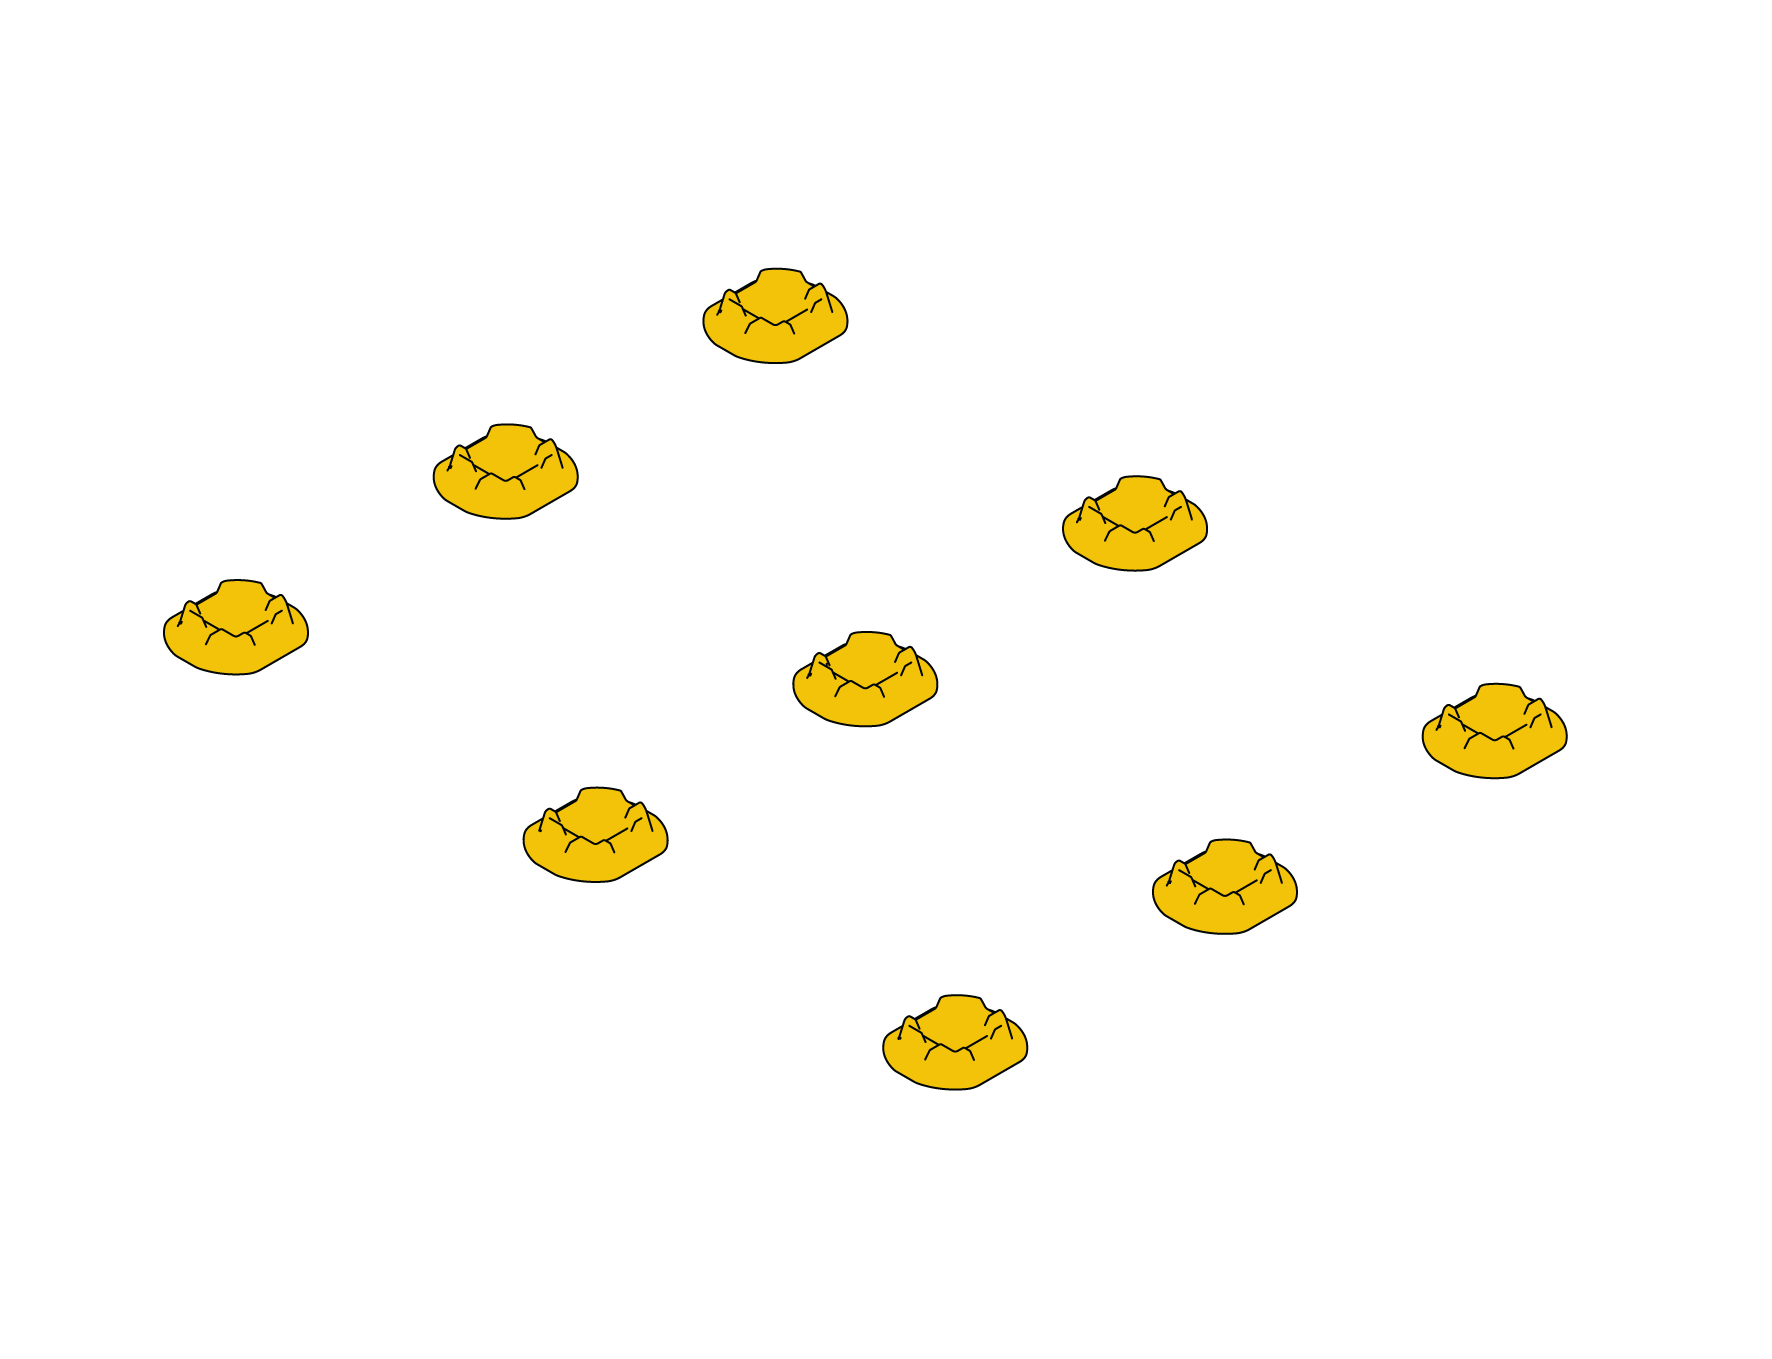
Position All DeckEzy Blocks
After planning your unique layout, place DeckEzy Blocks. Perimeter blocks should be no more than 12" in from each end. Exact spacing isn't critical for now, but blocks must be no more than 60" apart, in a straight row, and evenly spaced. This build uses a bearer substructure, so the spacing can equal 60" in both directions.

Level The Rim Bearers
Position your first row of posts. They should be notched to position the bearer. Do the same for the opposite row. Check level and make adjustments to posts as needed. Measure both diagonals, equal diagonals mean the frame is square. Don't fix permanently until level and square are confirmed.
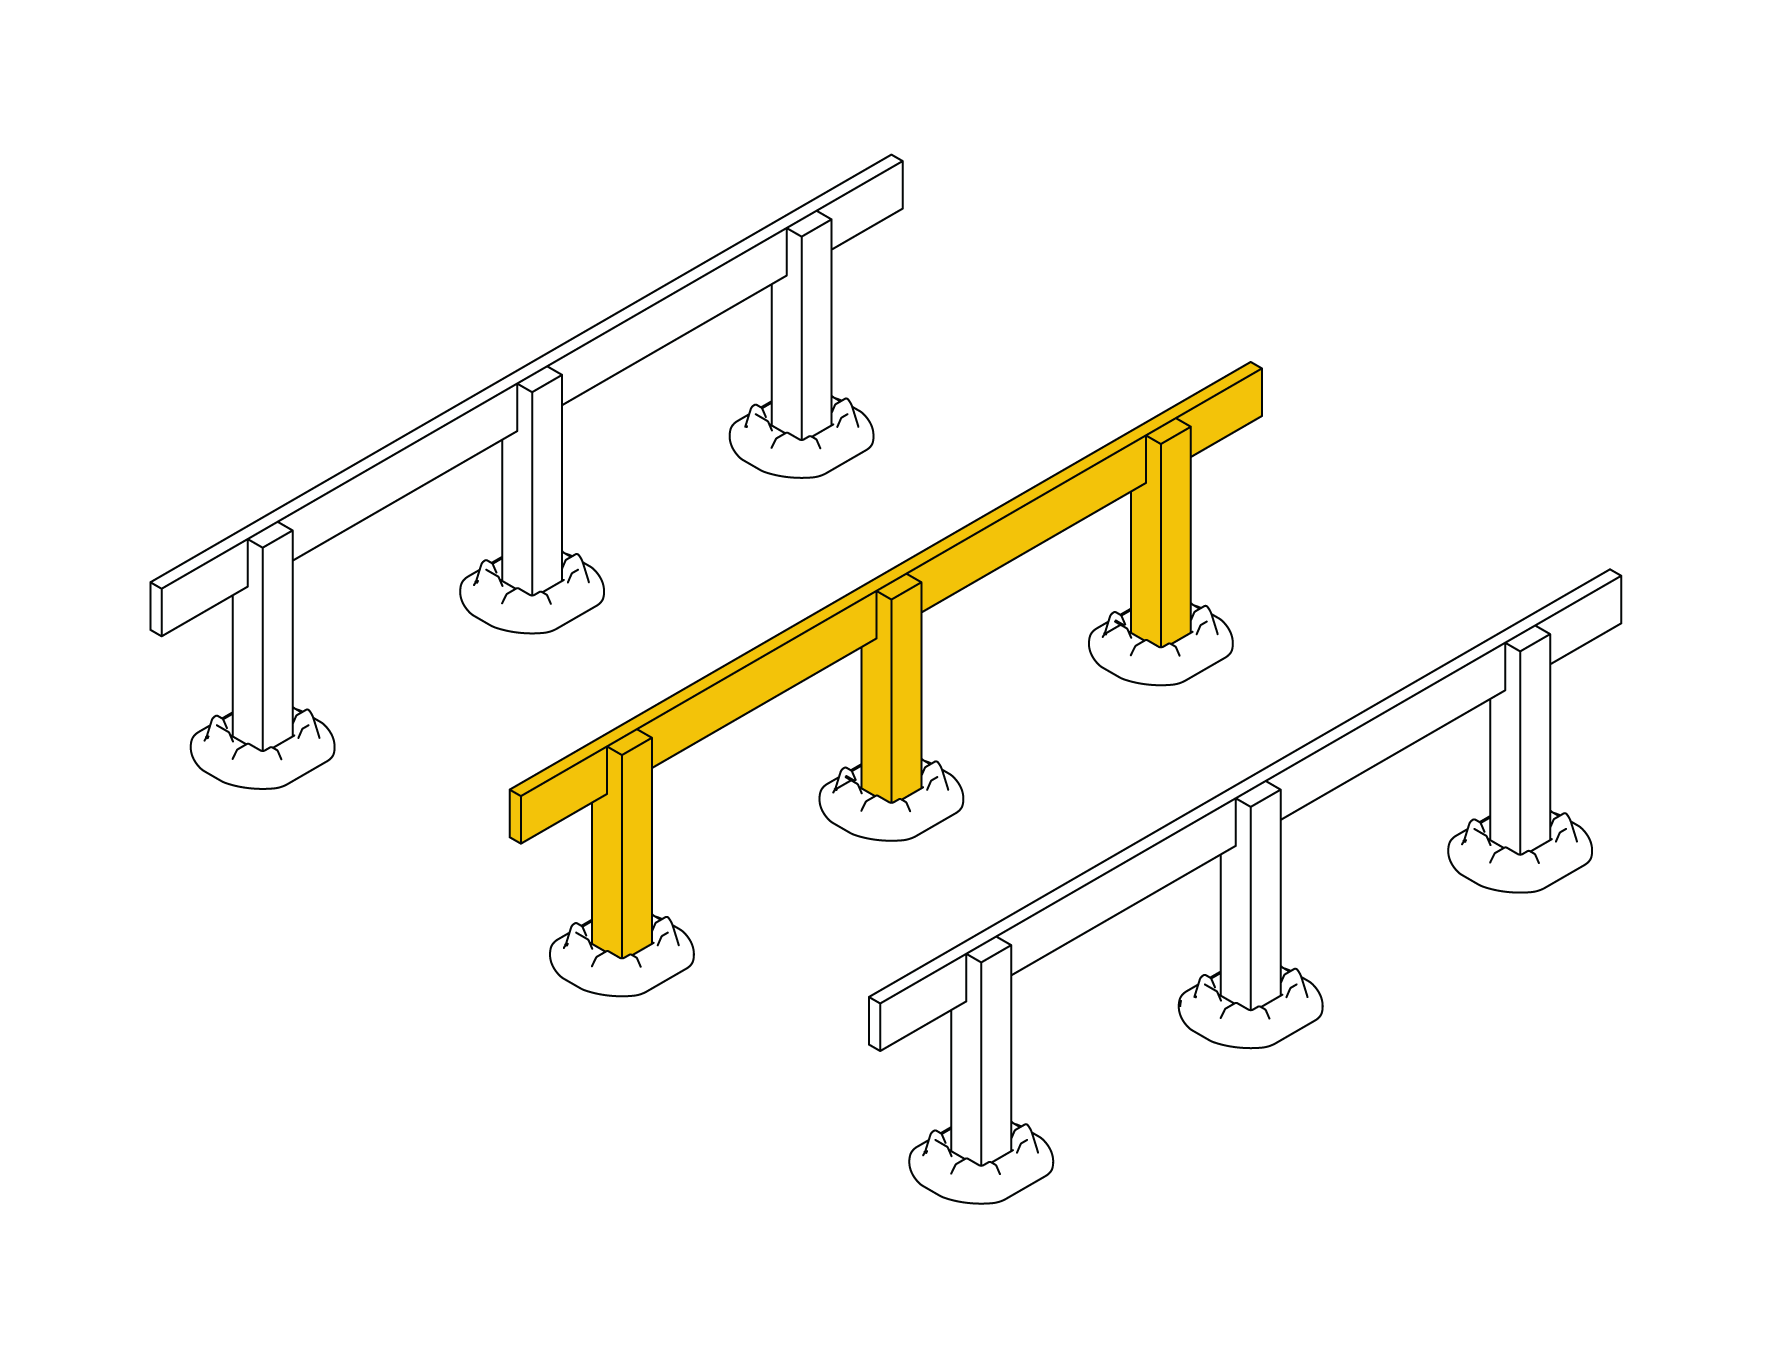
Add Interior Posts And Bearers
Once the outer posts and bearers are in place, you can position interior posts and bearers. Check level on all sides.
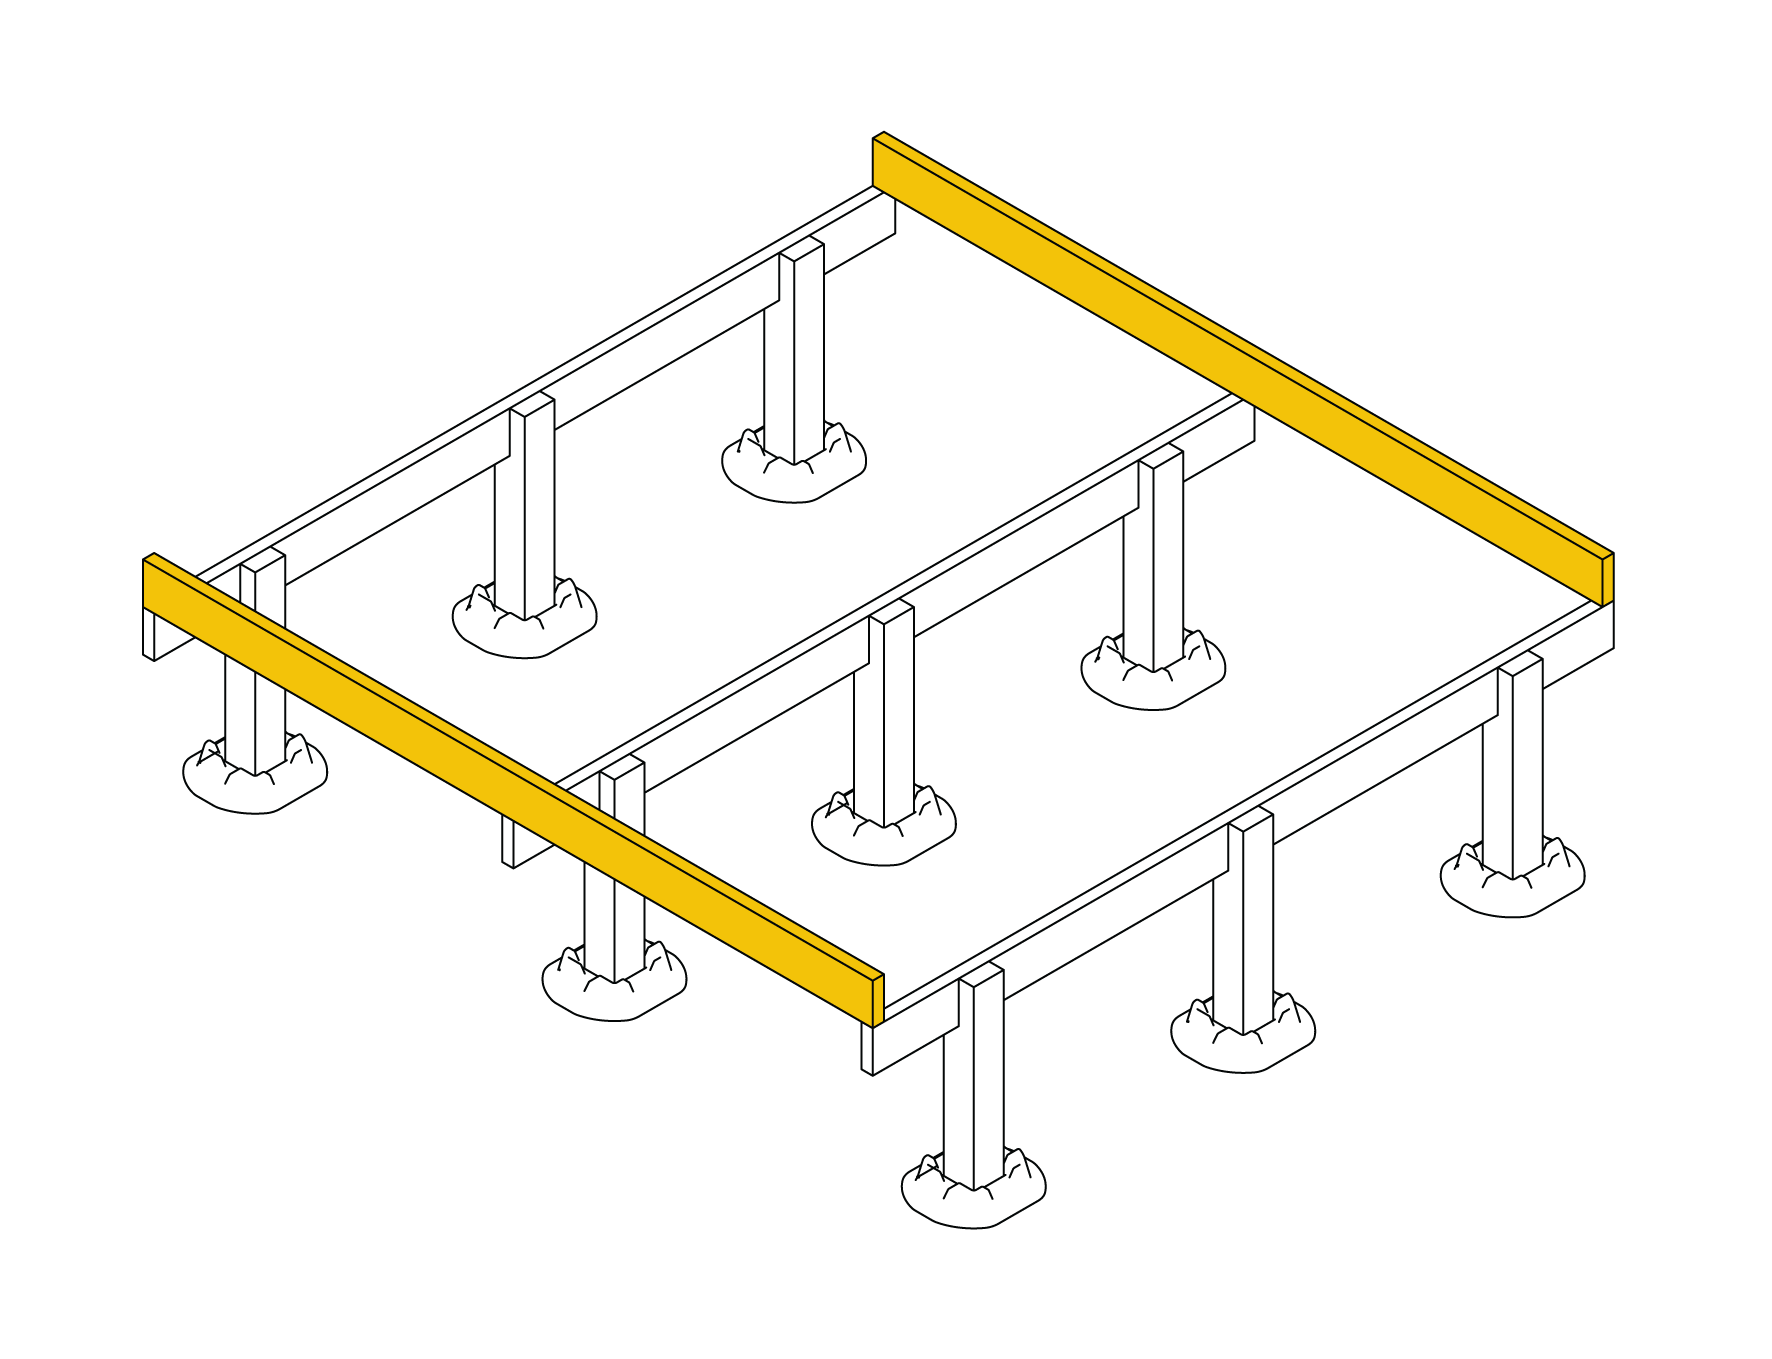
Attach The Rim Joists
With the substructure in place, fix the rim joists. Use two 14-gauge 3" countersunk exterior timber screws per connection. Joist straps can be used to strengthen the connection between joists and bearers. Joist cantilevers must not exceed 12" beyond the last support beam.
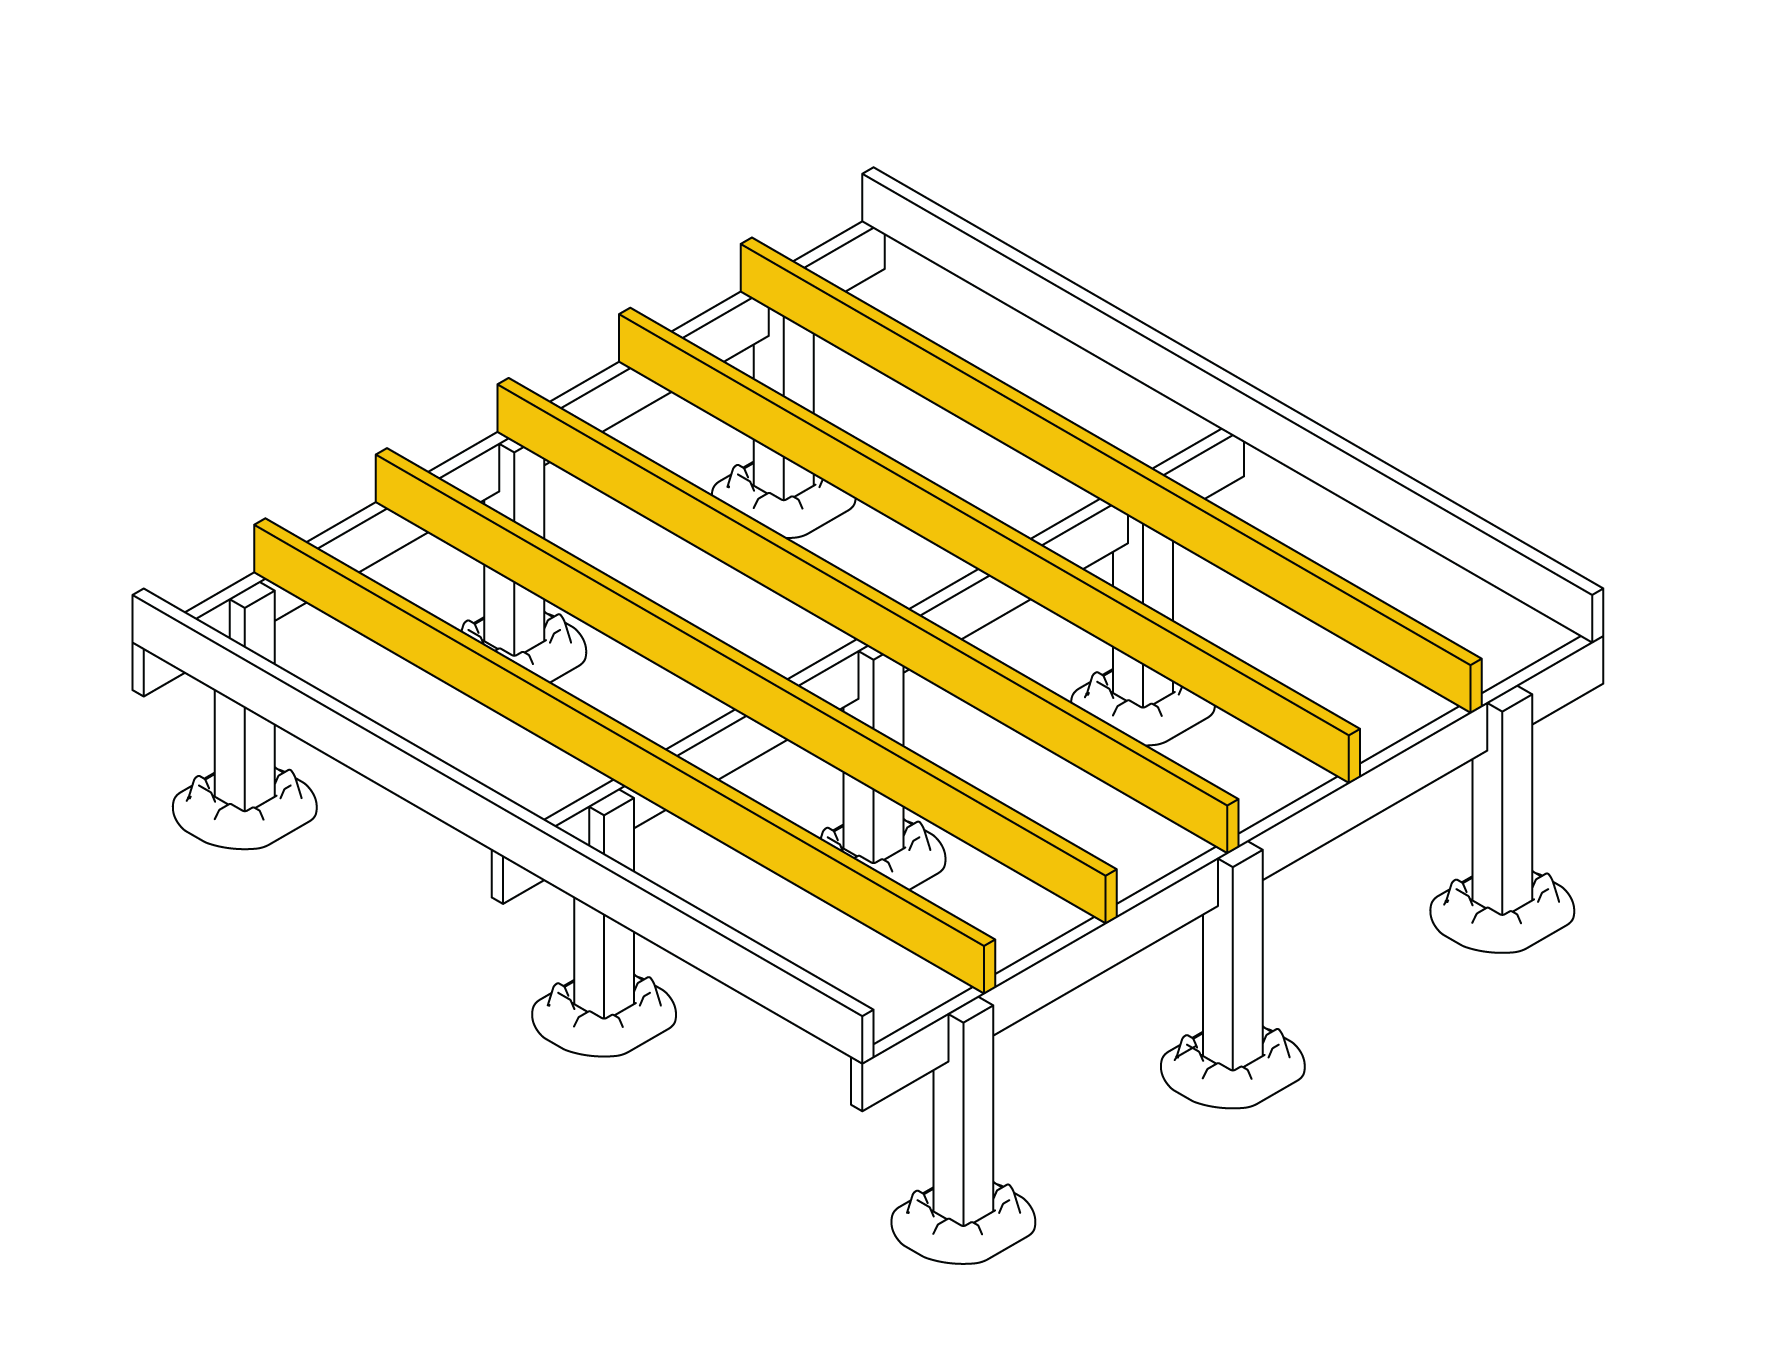
Attach The Interior Joists
Fix the remaining joists to the bearers with two 14-gauge 3" countersunk exterior timber screws per connection. Joist straps can be used to strengthen the connection between joists and bearers.
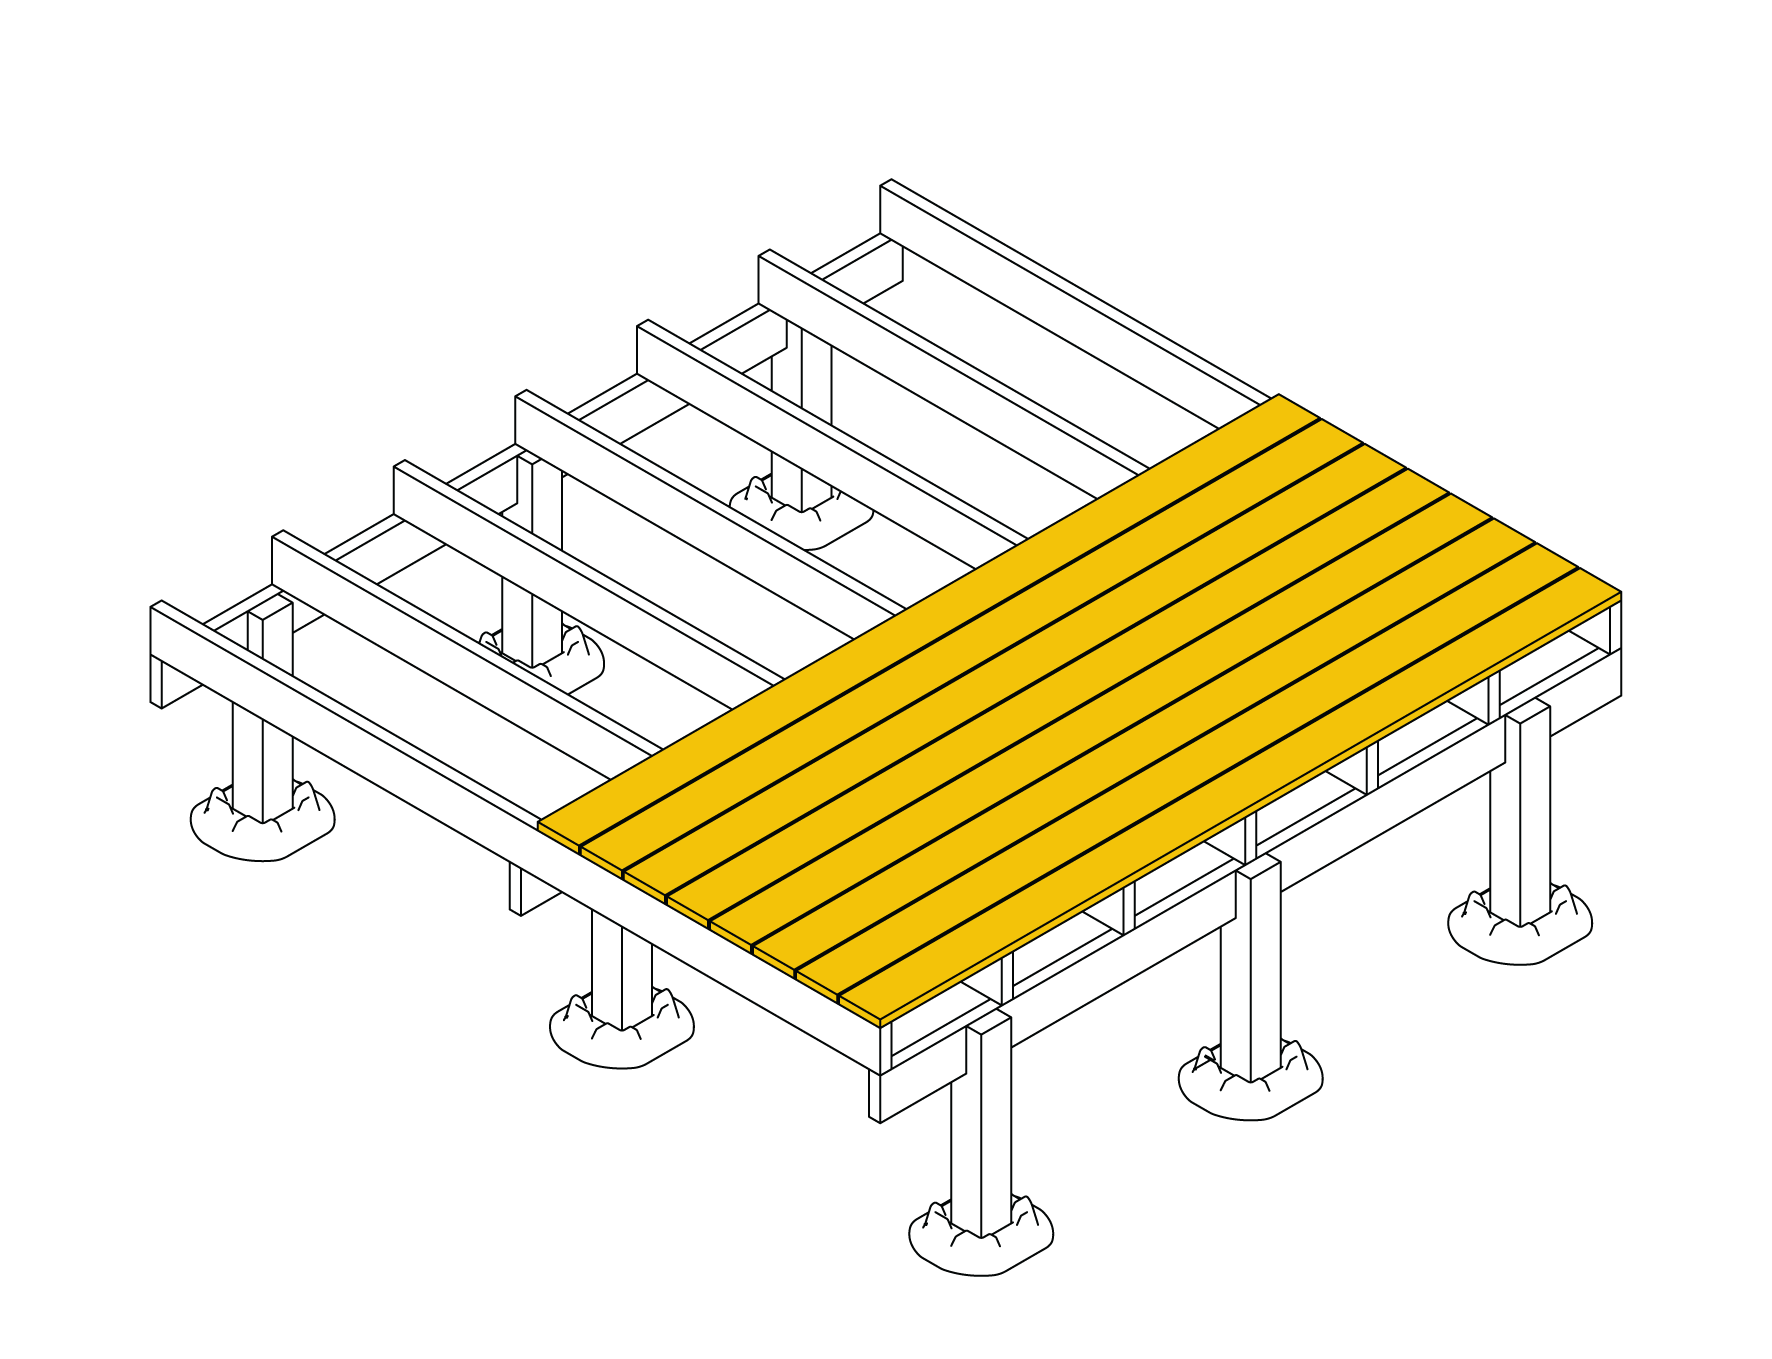
Attach Decking Boards
Start at one edge and fix the first board flush with the outer rim joist. Leave a ⅛"-¼" gap between board ends and any adjacent structure. Fix the rest per your decking manufacturer's instructions.
The materials shown are for illustration only. Lumber size, joist spacing, and hardware will vary with your deck's scale, load, and local code. Always check local building codes before you start, and consult a professional for advice specific to your build.
Mixed Footing Deck
The following steps are of an example mixed footing deck build approximately 10x10ft.
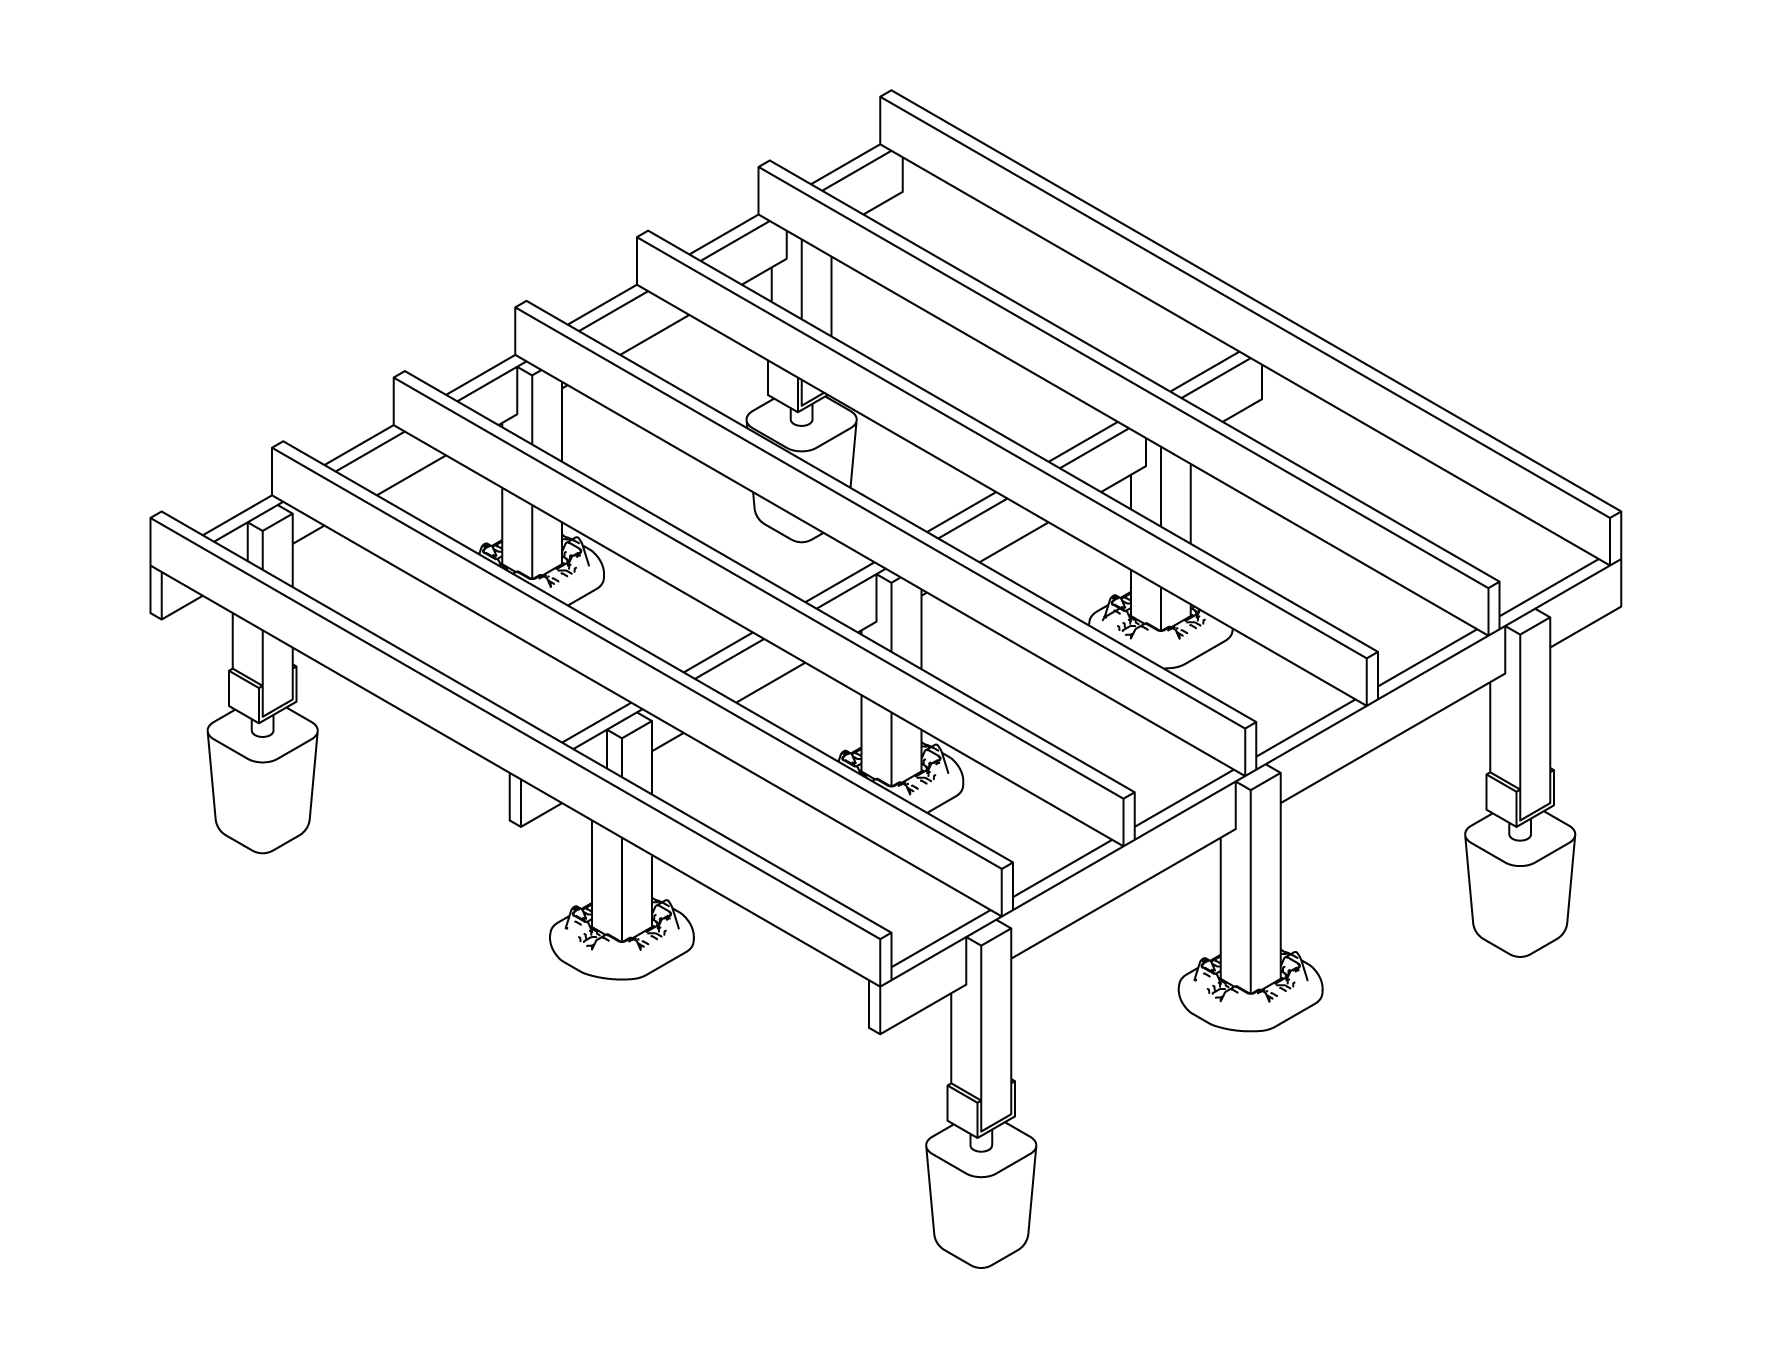
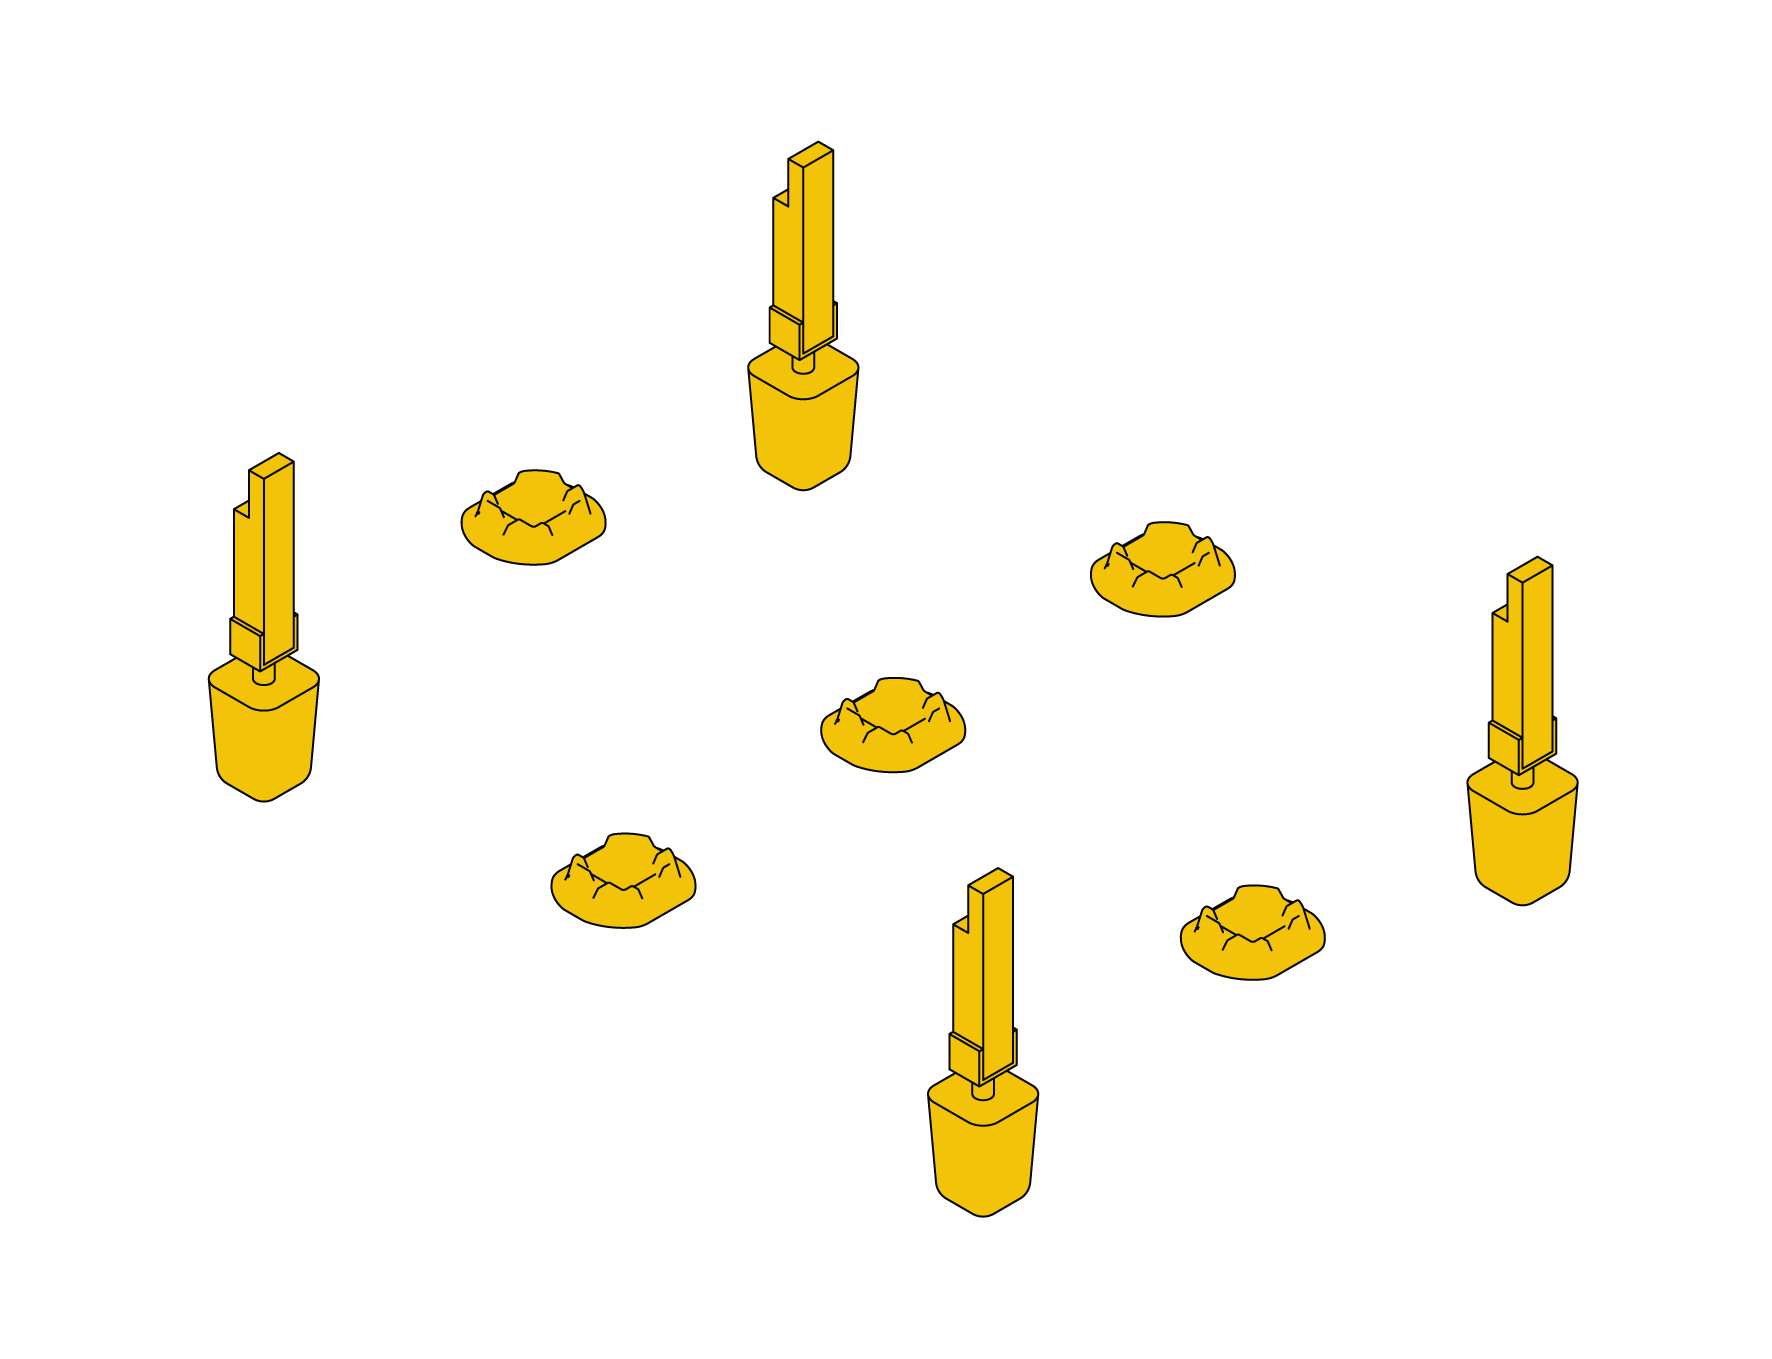
Set The Foundation
Set the concrete footings of the deck. Position remaining DeckEzy Blocks. Perimeter blocks should be no more than 12" in from each end. Exact spacing isn't critical, but blocks must be no more than 60" apart, in a straight row, and evenly spaced. This build uses a bearer substructure, so the spacing can equal 60" in both directions. Concrete footings do not alter span or joist spacing.

Level The Rim Bearers
Position the outermost rim bearers. Check level and make adjustments to posts as needed. Measure both diagonals, equal diagonals mean the frame is square. Don't fix permanently until level and square are confirmed.
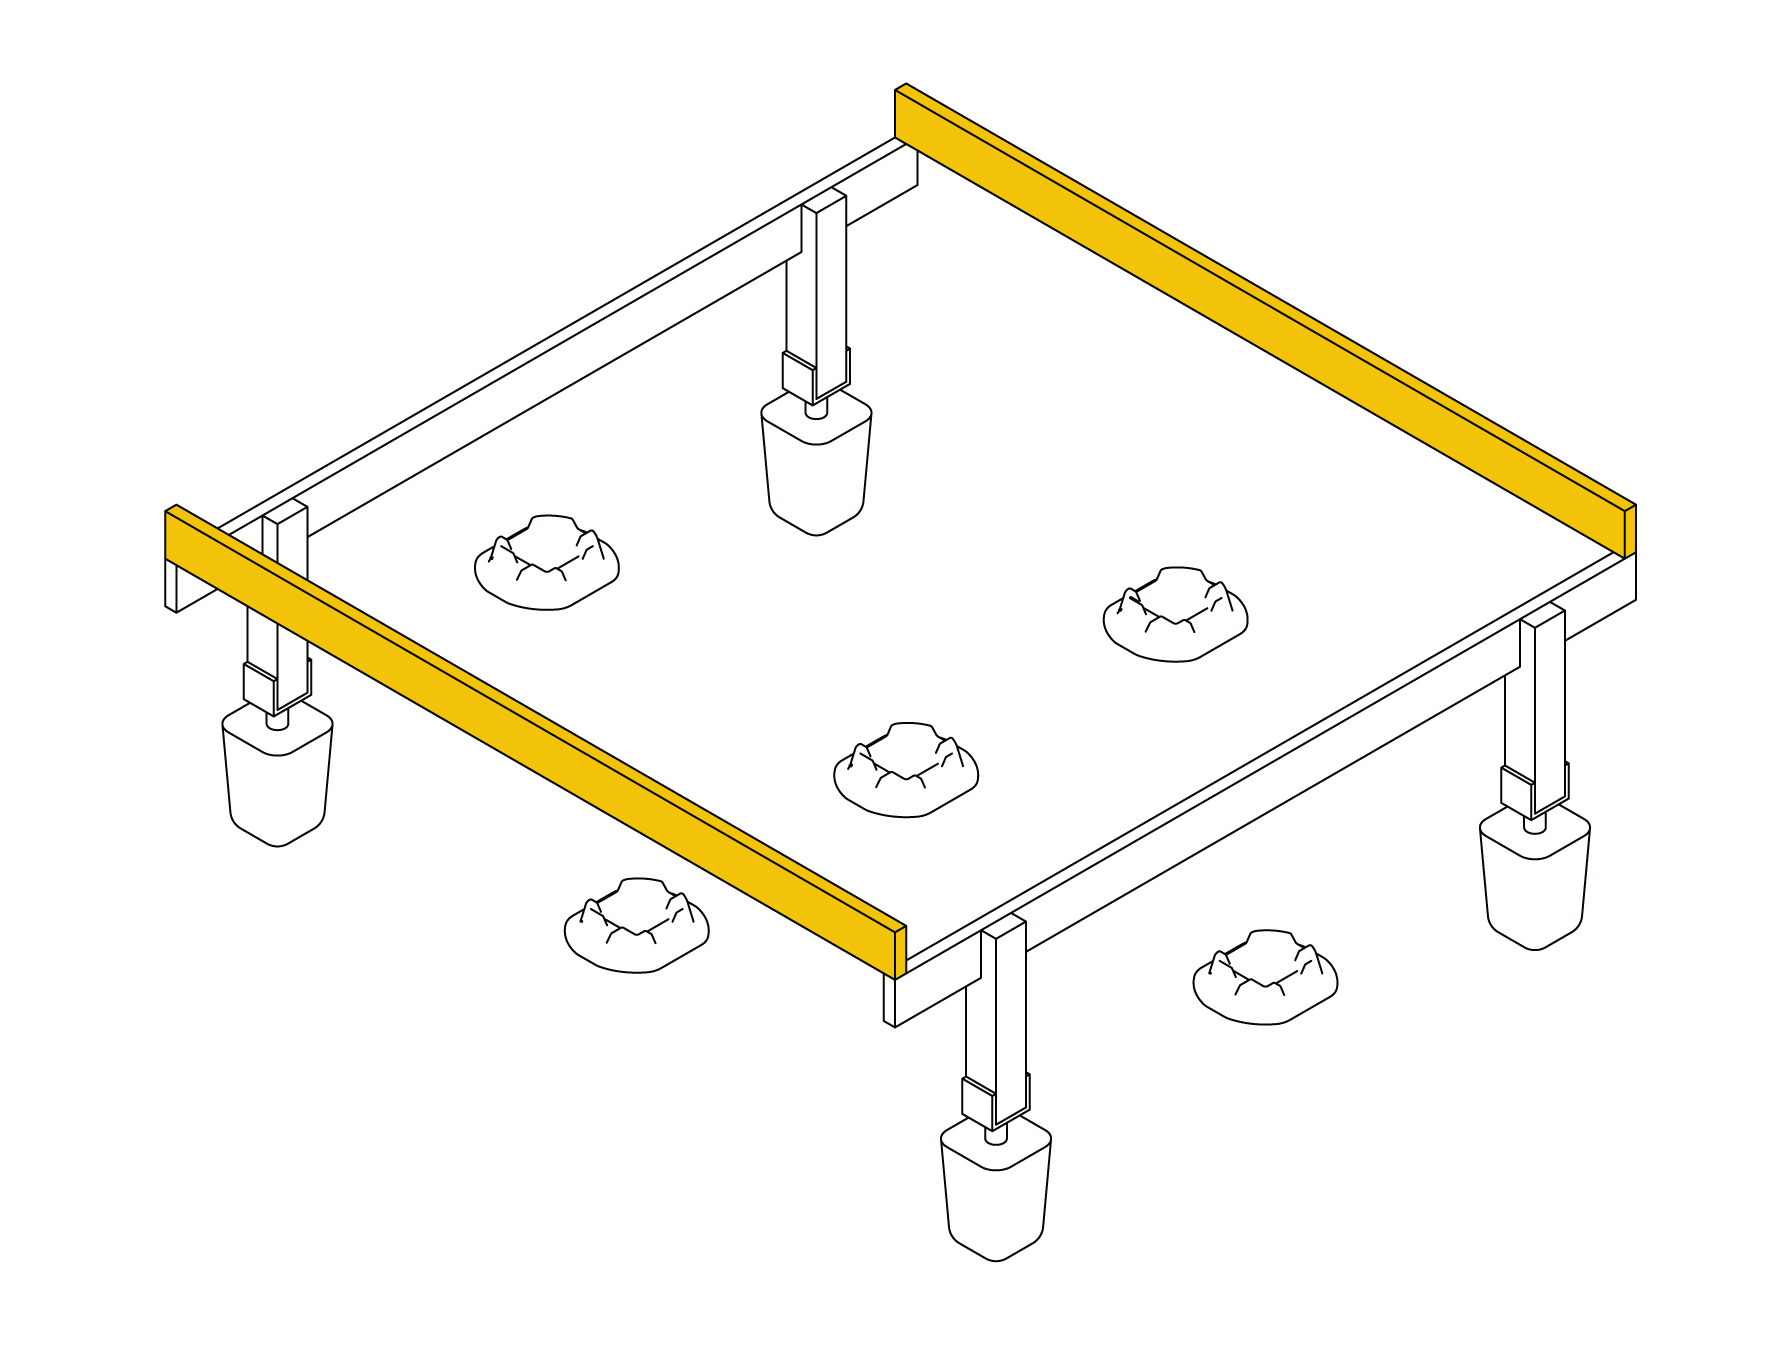
Attach The Rim Joists
With the outer substructure in place, fix the first rim joists. Use two 14-gauge 3" countersunk exterior timber screws per connection. Joist straps can be used to strengthen the connection between joists and bearers. Joist cantilevers must not exceed 12" beyond the last support beam.
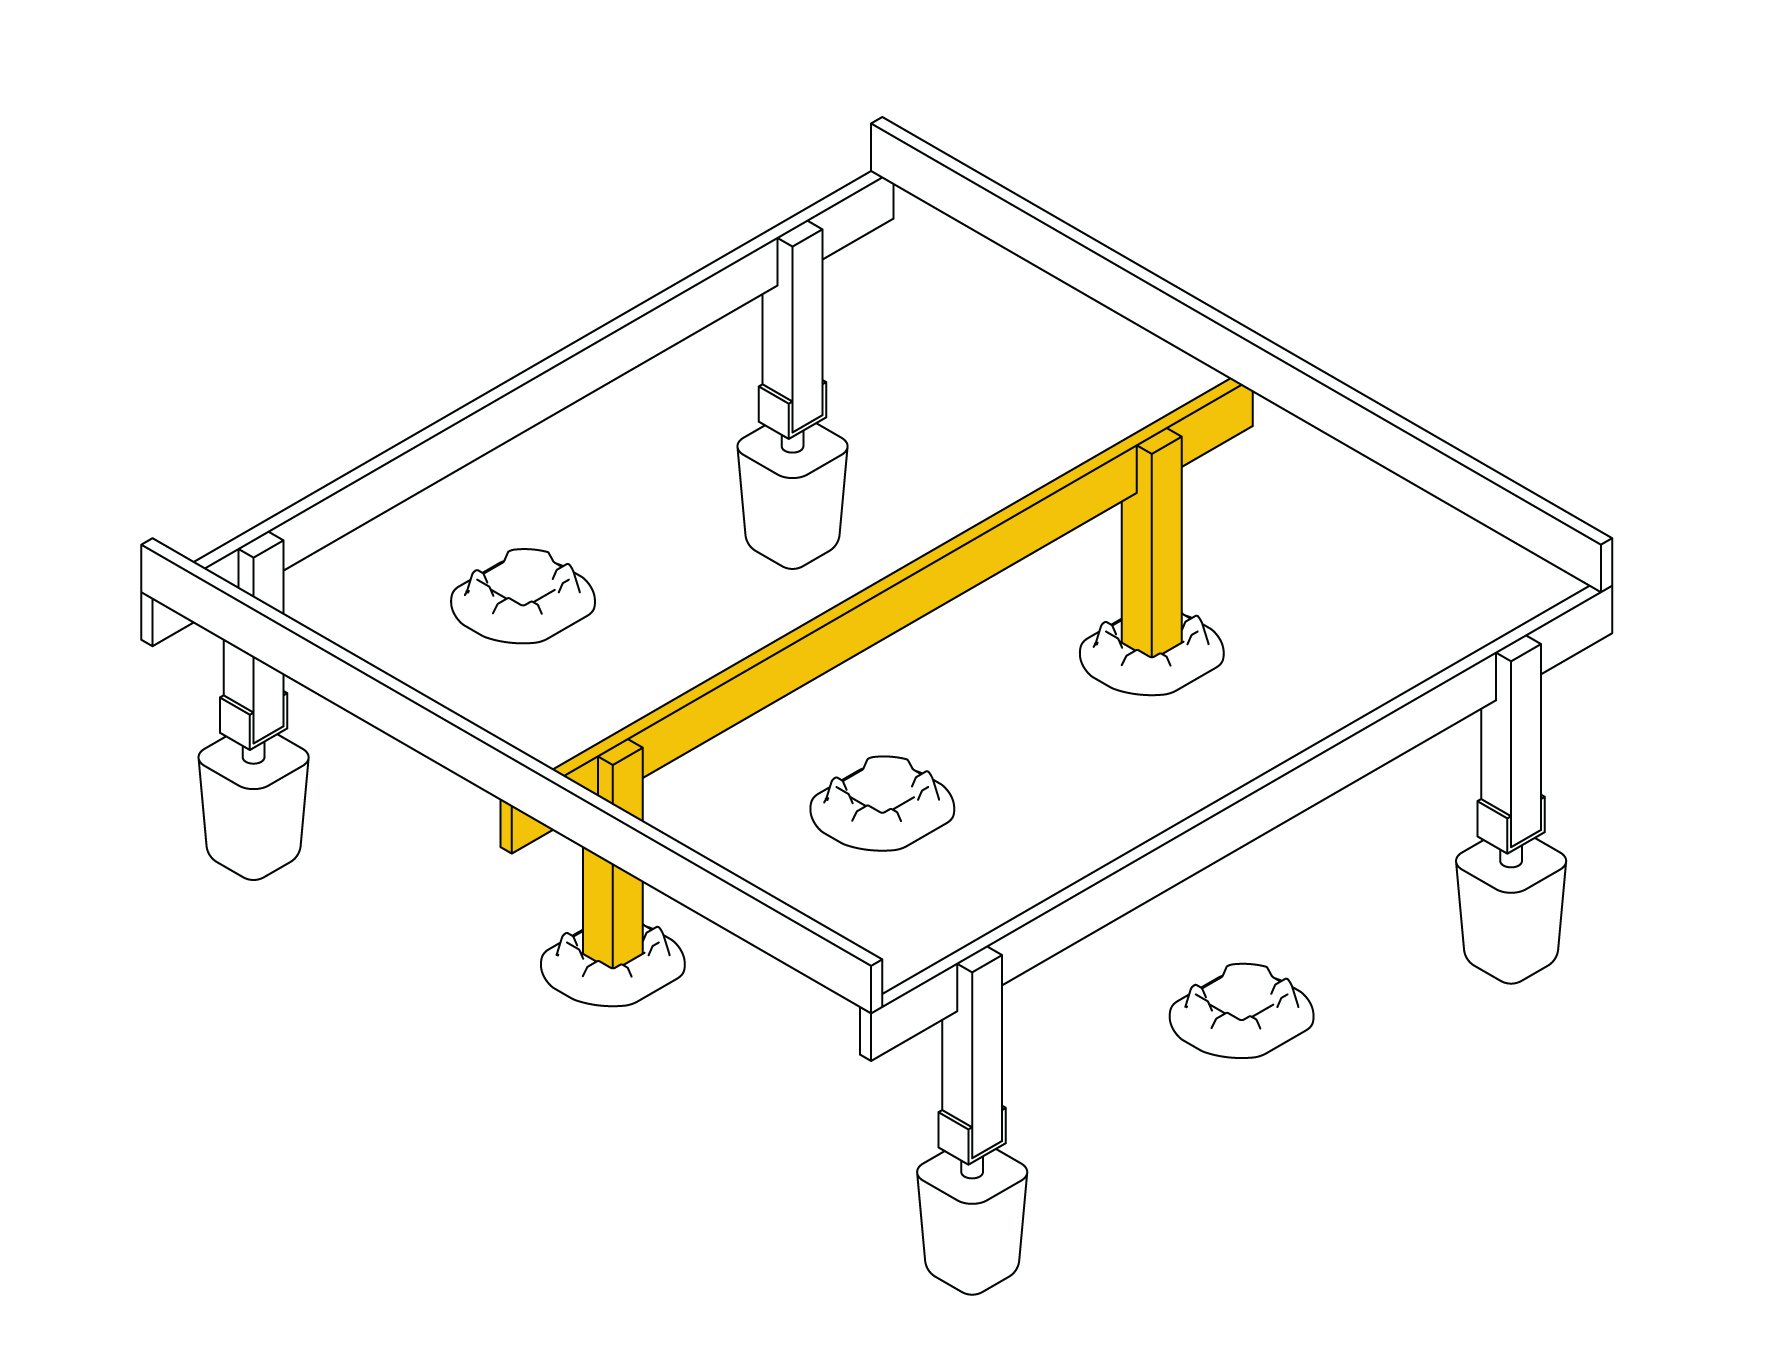
Attach The Interior Bearers
Once the outer posts and bearers are in place, you can position interior posts and bearers. Use the existing joists to achieve desired interior post height.
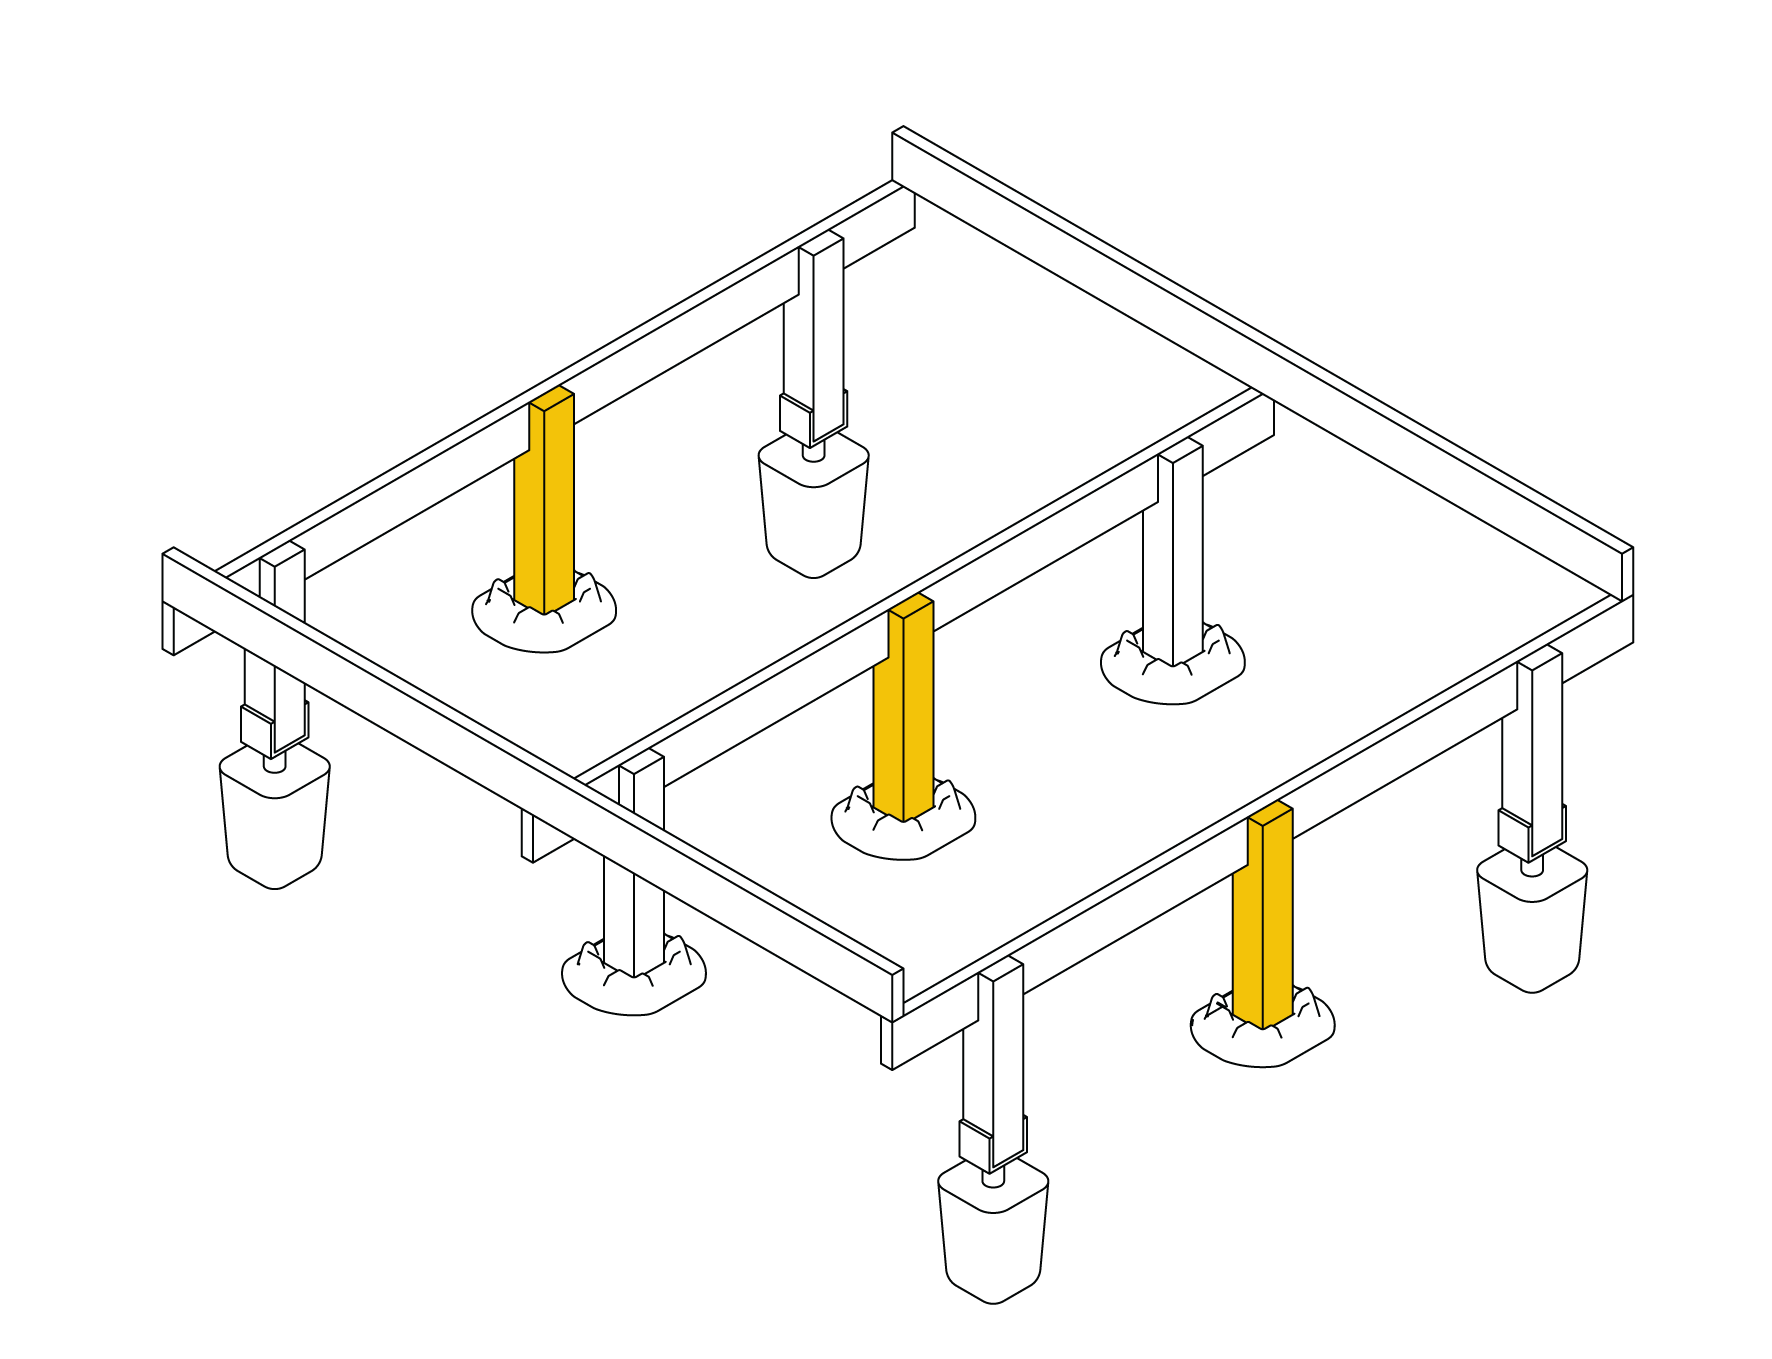
Attach Remaining Posts
Cut remaining posts to length and seat each between a joist and its block. With all posts in place, fix every connection with two 14-gauge 3" countersunk exterior timber screws.
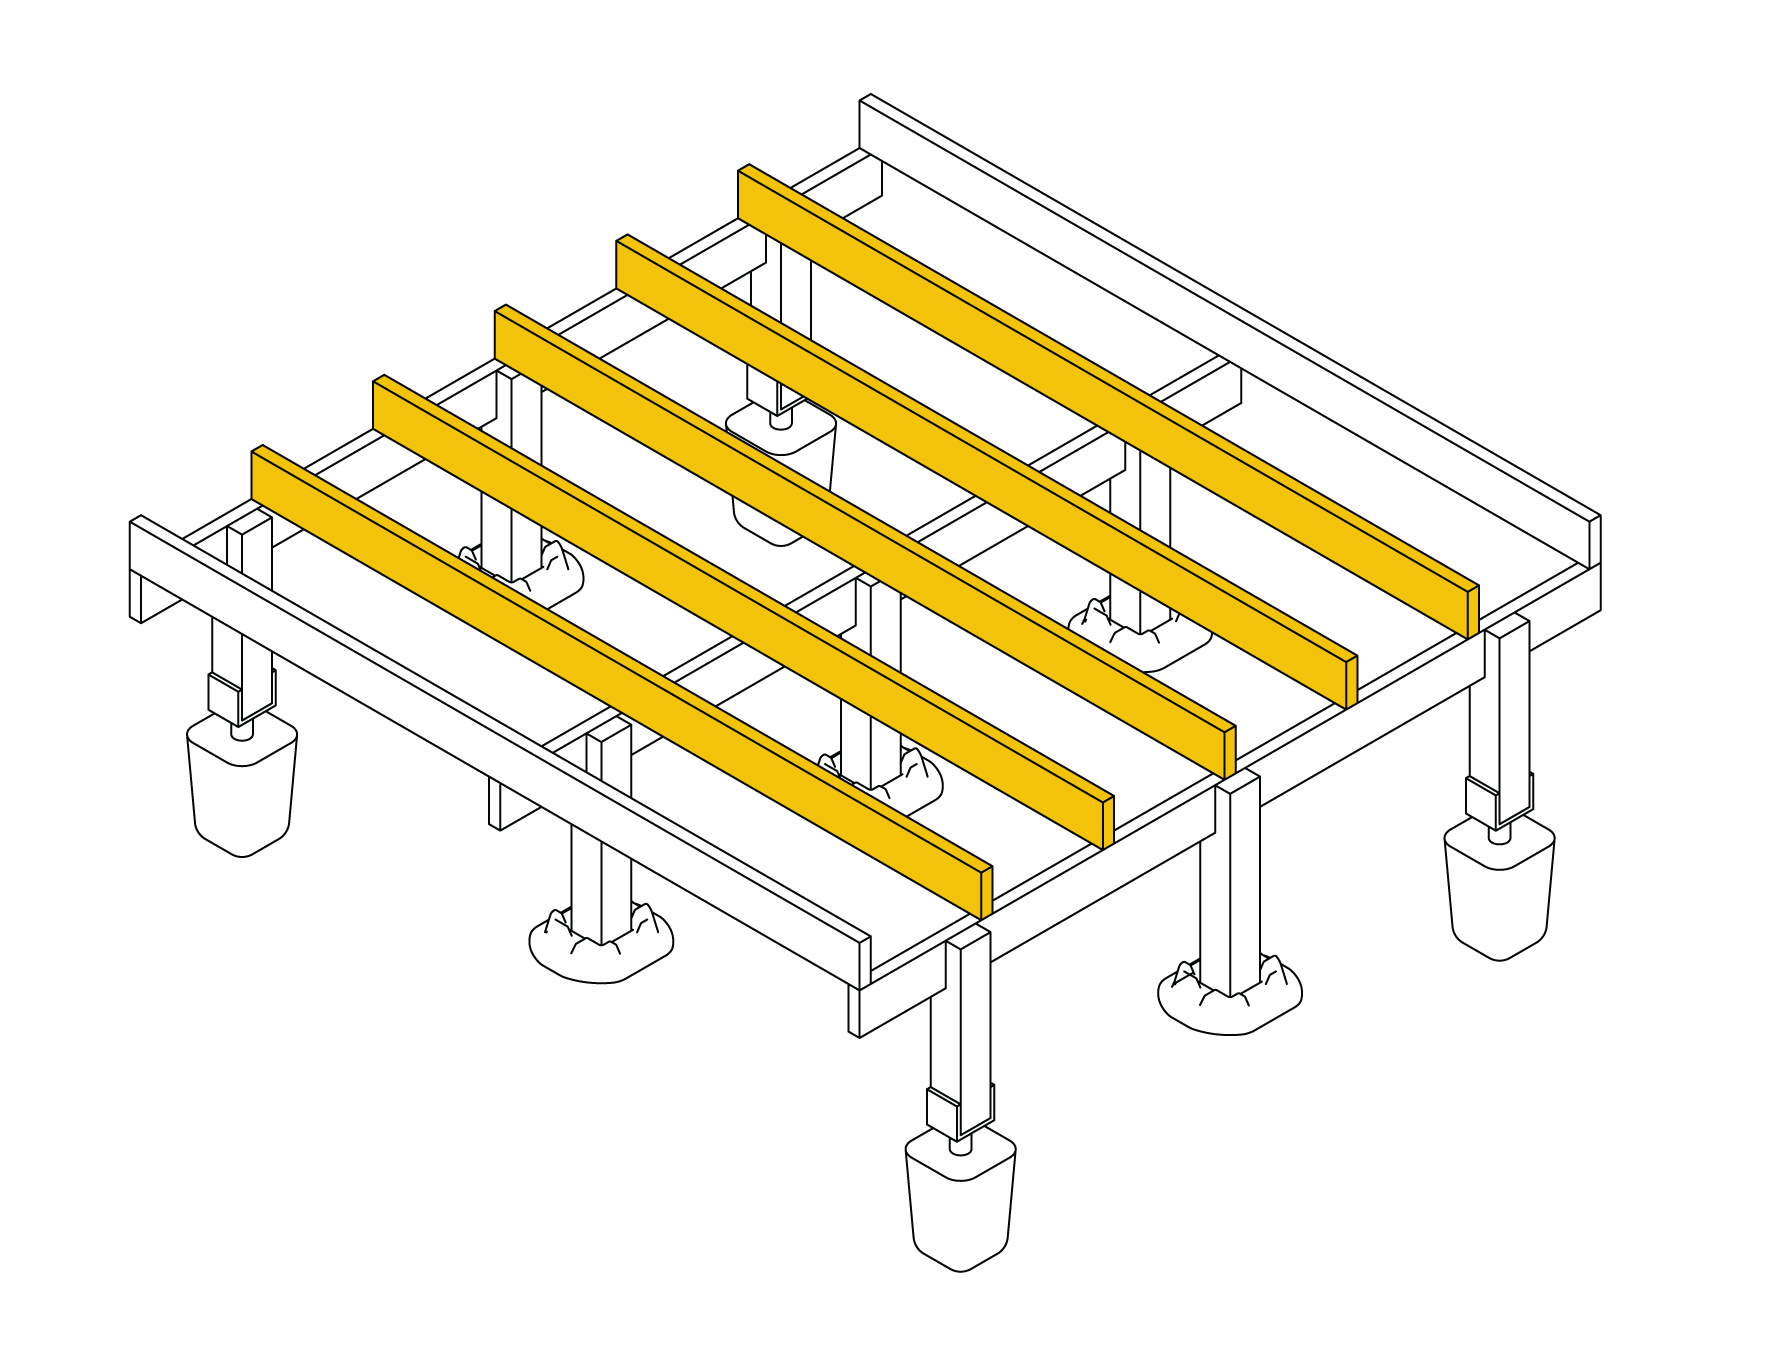
Attach Remaining Joists
Fix the remaining joists to the bearers with two 14-gauge 3" countersunk exterior timber screws per connection. Joist straps can be used to strengthen the connection between joists and bearers.
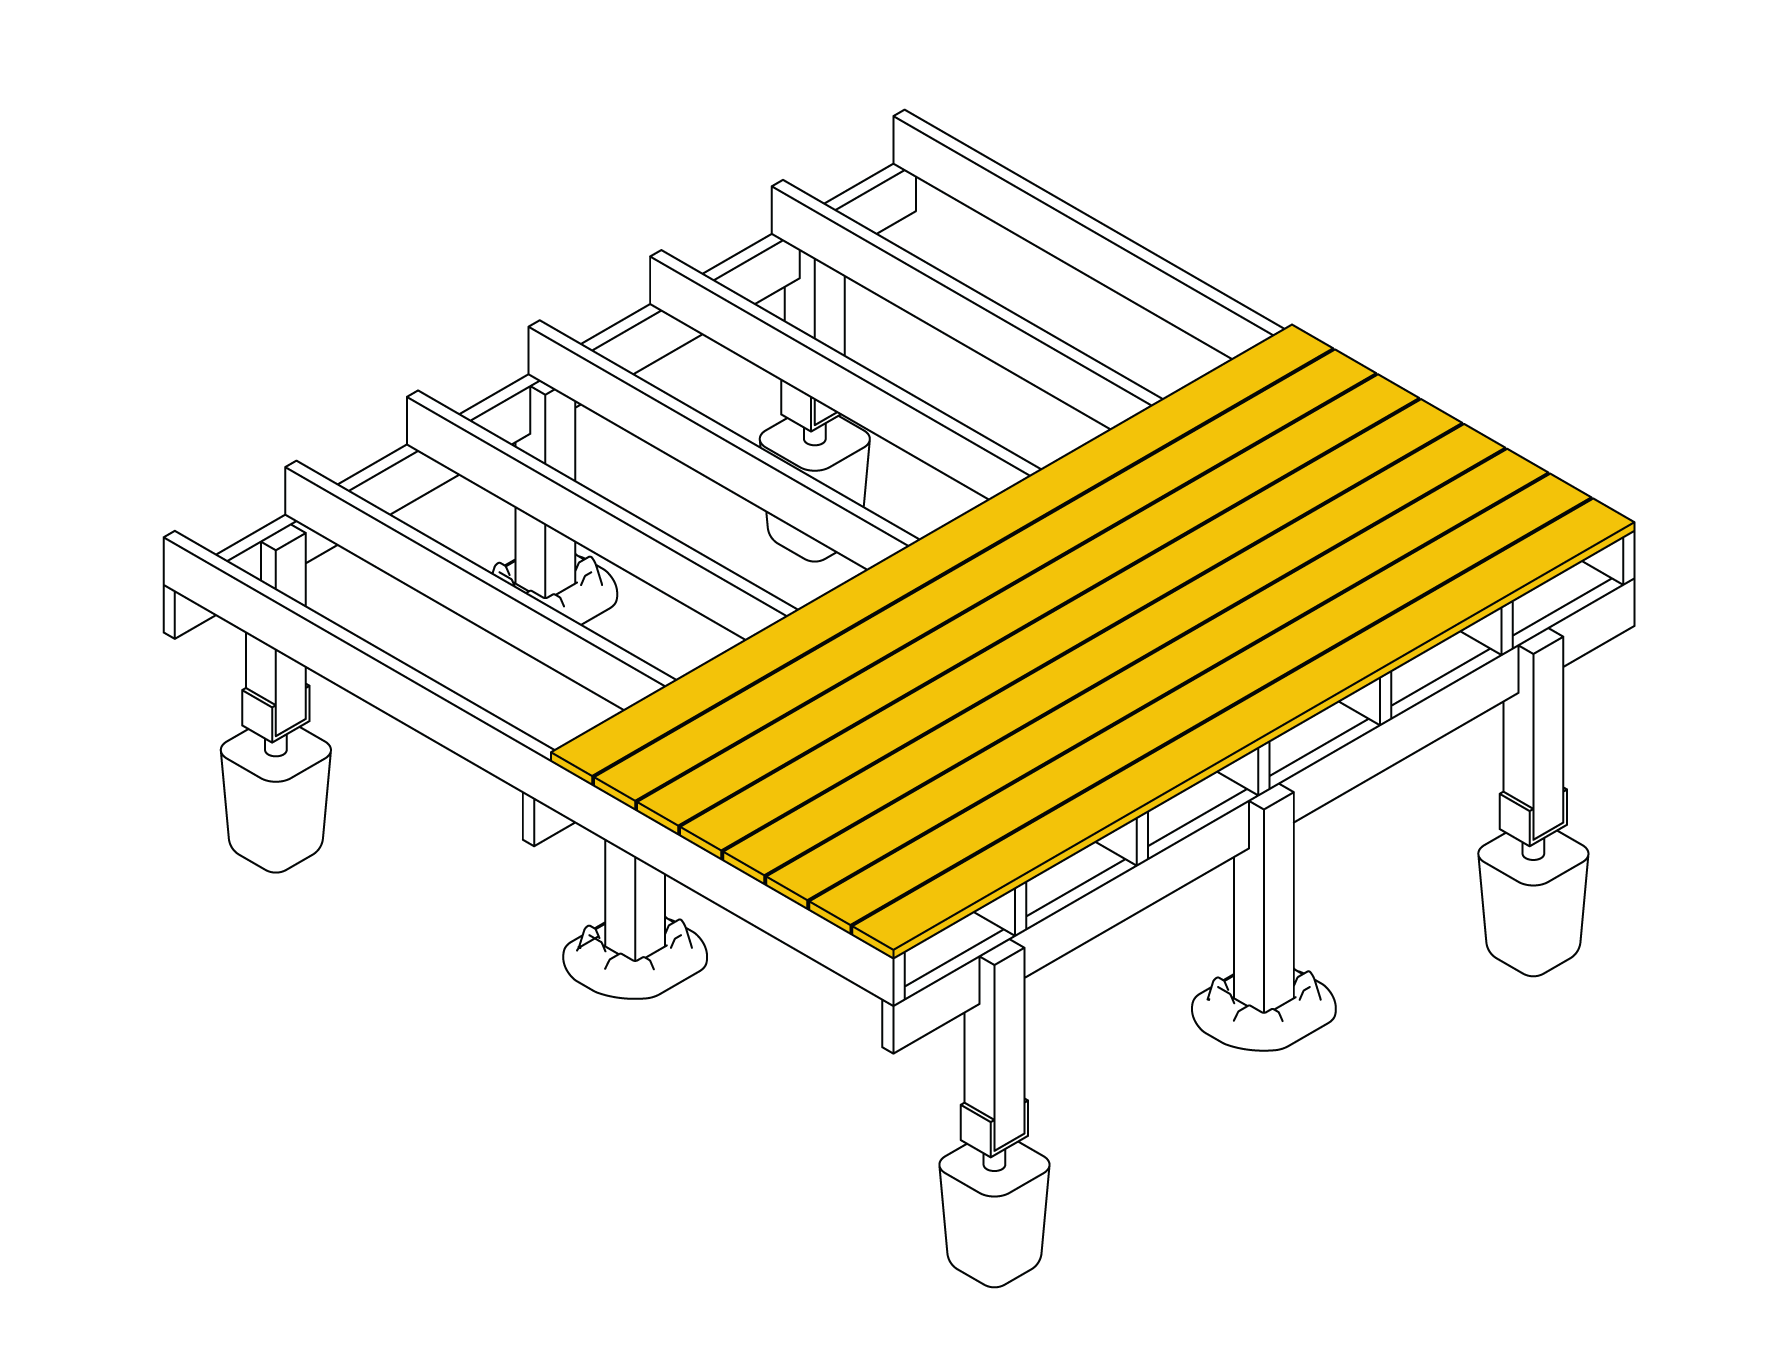
Attach Decking Boards
Start at one edge and fix the first board flush with the outer rim joist. Leave a ⅛"-¼" gap between board ends and any adjacent structure. Fix the rest per your decking manufacturer's instructions.
The materials shown are for illustration only. Lumber size, joist spacing, and hardware will vary with your deck's scale, load, and local code. Always check local building codes before you start, and consult a professional for advice specific to your build.